Recently, I made the life-altering discovery that my hair is not actually straight, as I had believed my whole life, but rather, wavy.
All of a sudden my social media algorithms were showing me “curly girl” haircare routines that would bring out my natural waves. And, predictably, these routines included a lot of products – gels, foams, creams, towels, hair tools and supplements were all spruiked in the interests of letting your “natural” hair shine.
While I’m a sucker for an internet trend, I always question what I’m being sold. So this spurred on a lot of research and experimentation with cheaper ways to achieve the results I’d been seeing online.
The culmination of all this was a few excellent, low-cost haircare solutions that I still swear by. Most of them are applicable to everyone, not just those in pursuit of curls. So here they are.
Turns out my “straight” hair looks like this if I scrunch in some gel when it’s wet.
1. Flax seed hair gel
According to curly routines, a key part of “setting” your wet waves or curls to prevent them from frizzing out into ill-defined nothingness is to create a “cast” using hair gel. Now, hair gel isn’t hugely expensive, but I try to avoid buying any new product unless I’m absolutely convinced it’s worthwhile.
Luckily, I discovered on Reddit that people had actually found more success making their own hair gel out of flax seeds (also known as linseeds). And as a bonus, rather than coating your hair in dehydrating chemical goop, flax seed gel actually has hydrating properties for the hair and contains Vitamin E and omega-3 fatty acids, which can boost the health of your hair.
When I spotted a pack of linseeds at my local IGA on clearance for 87 cents I knew I had to try it. I was amazed by how easy it was, and very pleased with the results on my hair.
Here’s the recipe I use:
Add ¼ cup of linseeds to 2 cups of water in a saucepan
Bring to a gentle boil
Simmer for 7-10 minutes stirring occasionally
Strain the liquid into a jug and discard the seeds (or let your kids play with them – they feel just like slime)
Add a couple of drops of essential oil for smell if you would like (also helps it last longer)
Pour half into a jar and store in the fridge (lasts two weeks or so)
Pour the other half into a ziploc bag and freeze for the future
I apply the gel to my hair when wet and gently scrunch it upwards to form and set my waves. When my hair is dry, I finger comb it lightly with some hair oil and this removes the crunchy gel-look and leaves me with soft, well-formed waves.
You could also use it to slick back your hair into a smooth bun or ponytail, or as a men’s styling gel.
My hair tends towards being greasy at the top and dry at the bottom, and lacks volume at the roots. This means dry shampoo is an essential product for me. It takes my hair from drab to fresh and allows me to inject some volume into my limp roots.
But dry shampoo in a can quite frankly gives me the ick. It stinks, I hate spraying aerosols near my face and it’s very expensive for a product that is essentially just starch in a can.
My personal stash of dry shampoo.
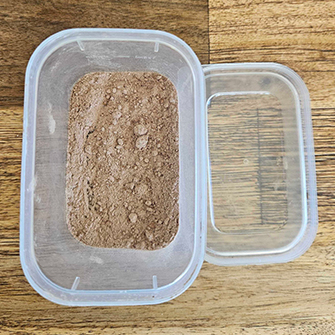
My DIY dry shampoo is honestly just as effective, basically free and lasts forever.
For hair that is light-coloured at the roots, you can literally just use straight cornstarch. There isn’t even a recipe. Just tip some cornstarch into a container, keep it in your bathroom and sprinkle it on your roots when they’re looking oily. Leave it on for a few minutes then blend it out so the powder isn’t visible.
If you have hair that is dark at the roots like me, you just need to add a teaspoon of pure cocoa powder to two tablespoons of cornstarch and voila – you have a brunette dry shampoo (there are methods out there for black hair – activated charcoal and red hair – cinnamon, but I haven’t tried those).
As mentioned above, while my roots get greasy, my ends can get pretty dry. I also suffer from some dryness and psoriasis on my scalp.
While there are plenty of different hair oil products to choose from (many of which are pretty costly), I’ve found plain old coconut oil from my cooking cupboard does the job on both my ends and my scalp.
I usually massage some into the dry parts on my scalp and wipe the excess onto my ends the night before wash day, or if I don’t remember, I just do it ten minutes before I hop in the shower.
4. Sock curls
Now I know I just spoke at length about bringing out my natural waves, but sometimes I’m looking for something a little more glamorous.
I have proved to myself time and time again that I am totally inept at using heat tools to create curls (and I simply can’t be bothered to spend hours in front of the mirror, regardless of the event).
Enter: sock curls, a life-changing innovation that is 100% free and takes, quite literally five minutes.
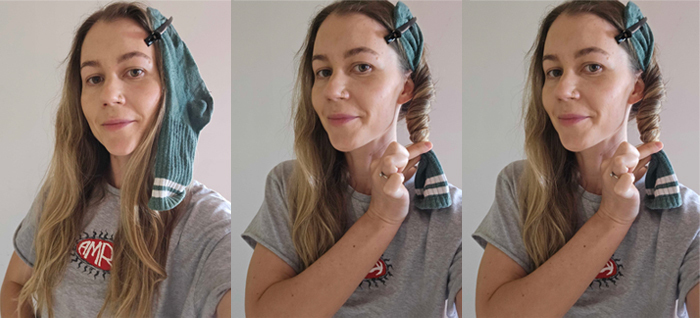
In the morning, remove the socks and instantly transform from alien life form to supermodel
All you need is two long-ish socks and a couple of hair ties. The process is kind of hard to describe in words (you can just google a video demonstration) but it’s actually very easy to do in practice.
Part your hair into two sections like you would to tie your hair into two low pigtails.
Clip a sock to the top of your head (toe side pointing up toward the top of your head). Some people prefer to simply hold the toe of the sock in their mouth but that offends my sensory preferences.
Wrap your hair around the sock.
Use the open end of the sock which is now dangling downwards and wrap it up over the hair you have wrapped.
Secure with a hair tie.
Repeat the process on the other side
Go to sleep for the night looking absolutely unhinged.
In the morning, remove the socks and instantly transform from alien life form to supermodel.
It’s the most unbelievable life hack ever. After I got into sock curls, I started to see all kinds of products being spruiked to achieve the same results – curling rods and so forth. But the reality is, socks do the job perfectly and you almost certainly already own a pair.
It ain’t glamorous, but it works!
5. Home hair cuts or cheap trainee cuts
Now cutting hair is not easy and a professional hairdresser’s skills cannot be replicated at home. But, having said that, our family has found that simple maintenance trims can be done at home with a good quality pair of hair dressing scissors (worth the small investment for the money saved on haircuts).
If you don’t have anyone in your home with the requisite skills… consider finding a training academy
My husband has a shaved head, but he is the family hairdresser and frequently trims my hair as well as our kids’. Not only does it save money but it’s also more convenient than making appointments for all of us and showing up at the hairdressers. We just whack something on the TV on a Sunday morning and he sorts out our hair free of charge.
If you don’t have anyone in your home with the requisite skills, or if you’d also like to colour your hair and box dye isn’t for you, consider finding a training academy or a TAFE near you that offers cheap or free hair services provided by trainees.
When I was younger I was a “hair model” at the Toni and Guy training academy. This basically means you’ll let a trainee do your hair as part of their education – my hair cuts and colours were always overseen by a highly experienced hairdresser and I was always happy with the results.
I actually haven’t tried this one myself, but when a colleague of mine heard I was writing this article, they shared their own recipe that they swear by.
Essentially, you just mix two tablespoons of sea salt with a cup of warm water in a spray bottle, and you can add in a little conditioner or essential oil too if you’d like. You can use this spray to add some texture and movement to your hair for a naturally tousled look.
Get money-saving ideas and DIY tips from our in-house thrift queen
Grace Smith is a senior content editor, she creates and edits content and feature articles for CHOICE magazine and website.
Grace writes on a diverse range of topics, from money-saving and consumer rights, to product safety and household products. Previously, she worked as a verifier, reviewing lab data and written content to ensure information was accurate. She has also worked as a content producer for the Household team.
As our resident CHOICE Cheapskate, Grace is the writer and producer of the CHOICE Cheapskate newsletter, providing regular money saving ideas and tricks.
Grace has a Bachelor of Arts from the University of Sydney. LinkedIn
For more than 60 years, CHOICE has been fighting the good fight for Australian consumers.
In the past year alone we've uncovered systemic issues with sunscreens, investigated shonky supermarket pricing, fought for stronger scam protections and helped make complex energy pricing fairer and clearer.
CHOICE is here to provide unbiased advice and independent testing in our world-class labs. We buy the products we test, just like you do, and our expert reviews are influence free. We’re here to help you choose smarter. Hopefully you’ll also save some money along the way.
Thanks to CHOICE, you’ll never be alone when a business treats you unfairly. You can support our work by joining or donating to our cause.