While CHOICE welcomes the move towards making smartphones last longer, we found that not all repairs on the G22 are likely to be easy to do yourself. We’ll be watching eagerly to see which other manufacturers jump on board to partner with iFixit to release repairable products. We’re hopeful this signals the start of a trend towards making phones better by design.
Smartphones are full of expensive consumable resources, yet they have a disappointingly short lifespan. In fact, our reliability surveys often only include the last five years of ownership because very few people expect to keep their phones past this point. So we’re happy to see manufacturers starting to make efforts to create more sustainable smartphones.
Of course, the most sustainable product is the one you already have. This is why making phones easily
repairable goes a long way towards extending their lifespan.
While some of us might remember that early incarnations of the mobile phone were simple to repair (for example, they had easily swappable batteries), the increasing complexity of the smartphone has meant repairability has been left by the wayside. That is, until recently.
Making phones easily repairable goes a long way towards extending their lifespan
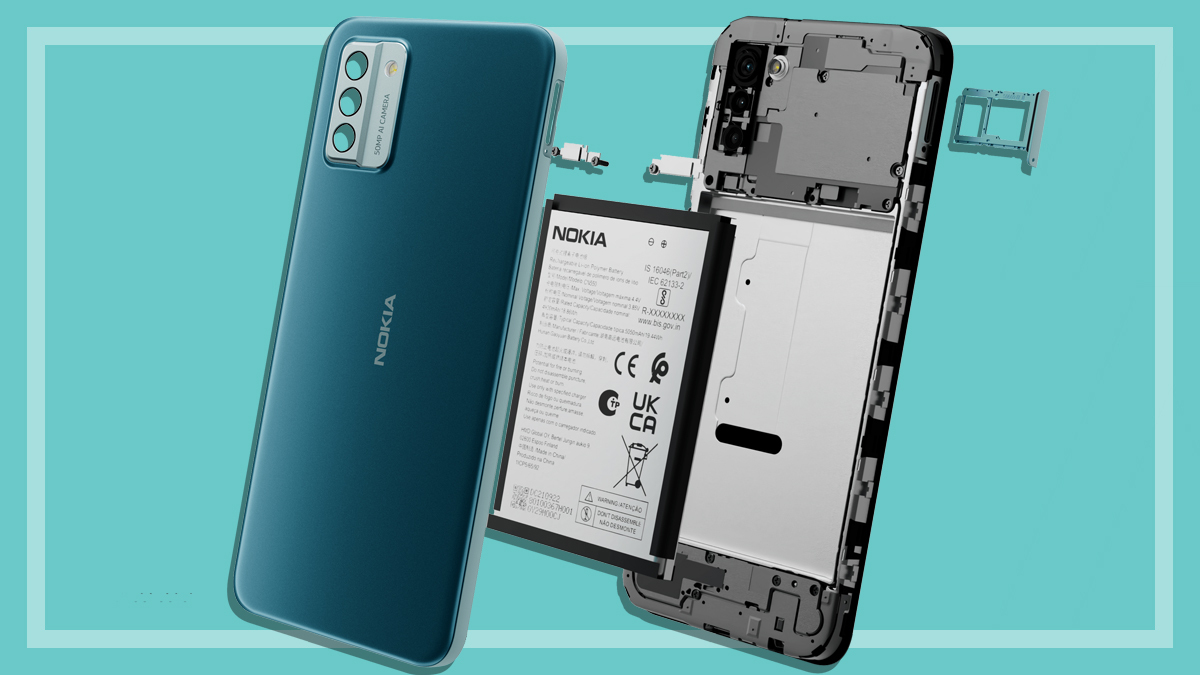
Nokia has designed the G22 phone for moderate repairability (more on this later) and partnered with e-commerce and how-to site iFixit, which supplies the instructions and repair kits to carry out a number of simple repairs including replacement of the screen and the USB-C charge port.
We tried replacing the screen on the G22 to see exactly how easy it is to repair and to weigh in on whether DIY repairability is as handy as it sounds.
How do Nokia repairable phones work?
A phone that can be easily repaired at home sounds like a great idea. But it’s worth noting that the repair kits aren’t included with the phone. If you have an issue with the phone, you can order the appropriate kit from iFixit directly and replace the component yourself. Prices for the repair kits range from $35 up to $105, depending on the component, plus delivery costs.
Which parts can be repaired?
Nokia and iFixit have focused on the phone parts that tend to fail the most:
front screen
battery
charging port
back screen.
It’s also worth noting that once you shell out for the repair tools, you can reuse these for future repairs, saving yourself money on future kits. iFixit has comprehensive guides on their website to walk you through the replacement components.
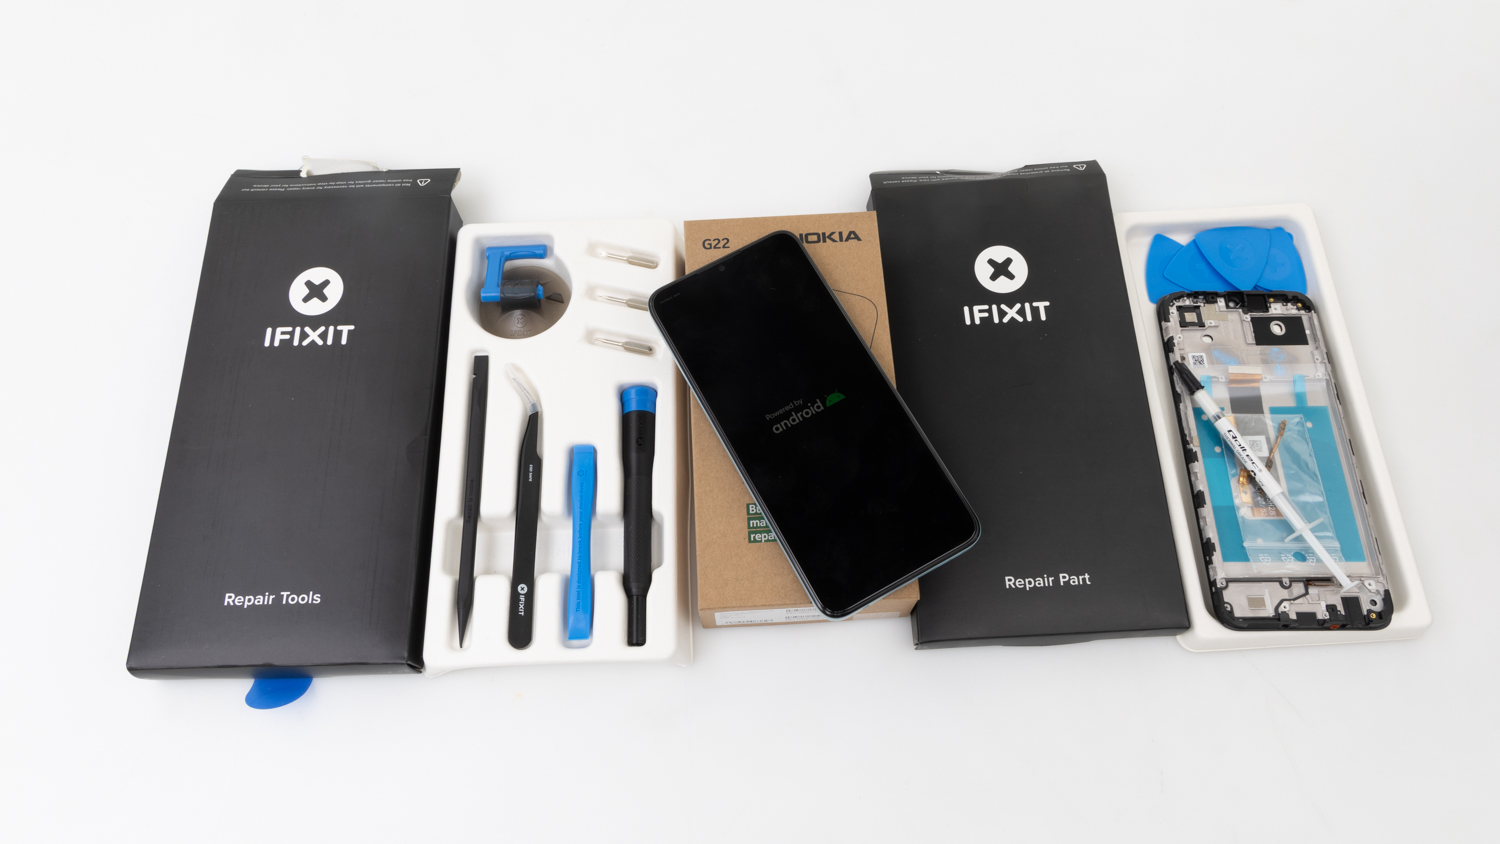
Repair kit from iFixit, the Nokia G22 and the replacement part.
What’s the warranty on the Nokia G22 repairable phone?
While you’d like to think that a repairable phone would last a lot longer than a standard phone, the Nokia G22 only comes with a three-year warranty. The good news is that if you carry out a repair using one of the iFixit kits, this won’t void your warranty. Nokia has also promised to keep security updates for three years and OS upgrades for two years.
The latter is a little disappointing, given OS upgrades are one of the reasons people may buy a new phone, but as Nokia has pointed out, it’s a relatively low-cost smartphone and increasing the upgrade time would require increasing the price of the phone.
How do you repair the Nokia G22?
In order to put the repairability of this new phone to the test, we decided to carry out a repair ourselves. We set out to replace the screen, as roughly 7% of people in our last reliability survey who’d bought phones in the past five years said that they had an issue with a cracked/broken screen.
Ordering the replacement kit
Buying the kit online was simple and it arrived quickly in the post. The kit came with two packages: one containing the replacement screen (plus components) and the other with all the tools needed to replace it.
The replacement screen package came with:
front glass digitizer screen
LED display panel
power and volume button internal cable
camera bracket
camera foam and adhesive
battery adhesive
battery foil
thermal Paste.
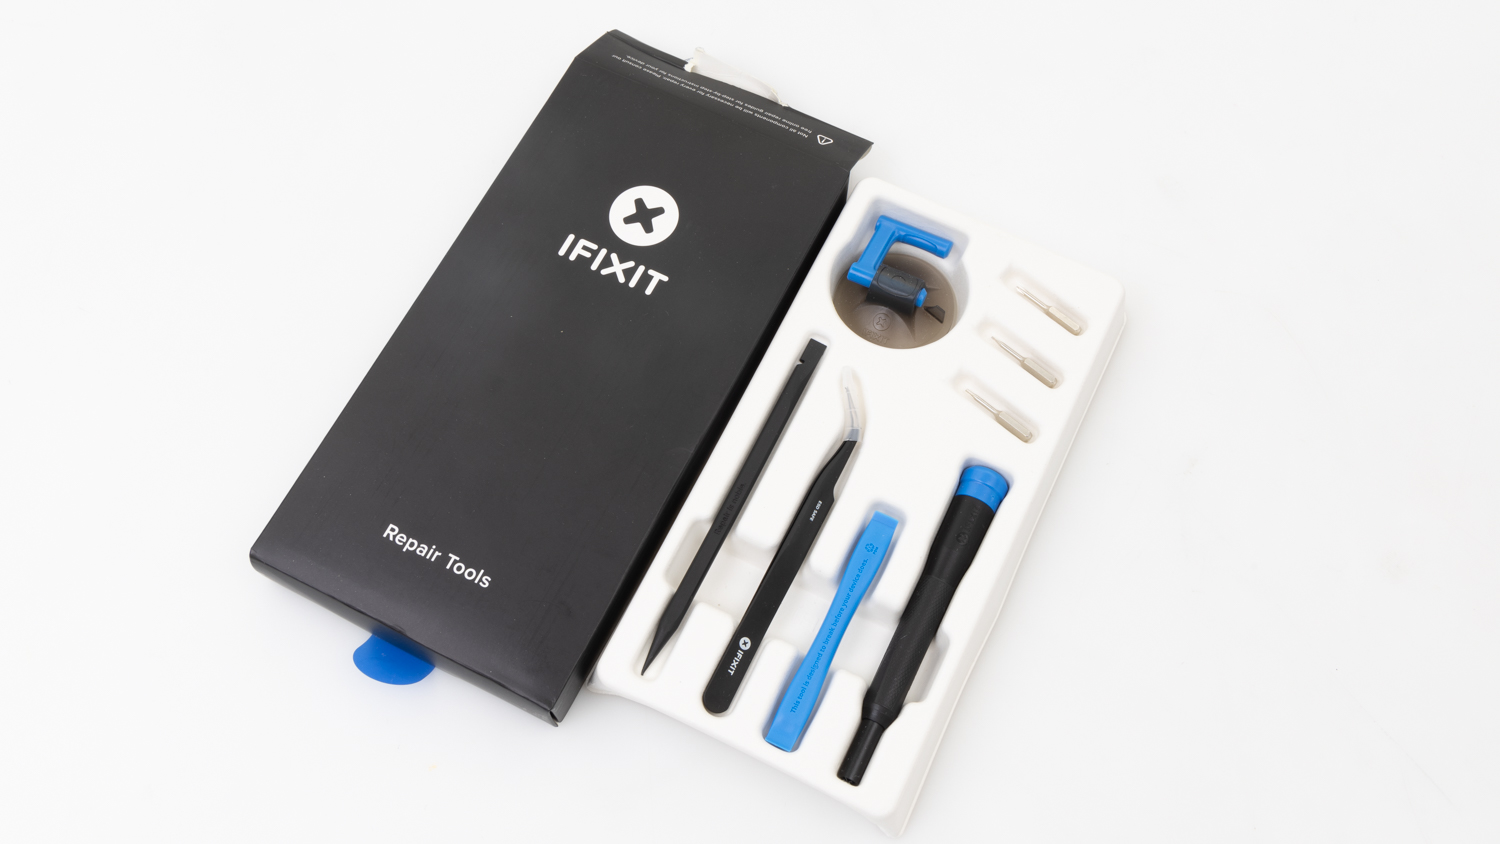
The repair tools came packaged with:
spudger (think of it as a wide flathead screwdriver that lets you get into narrow parts of phones where you need leverage)
opening tool
suction handle
angled tweezers
precision bit driver
Philips #00 bit
Torx T3 bit
Torx T5 bit
opening picks.
The repair tools supplied by iFixit.
Preparing to start the repair
Before starting the repair, we headed online to watch the guidance videos. Here, we discovered a small issue – there is both an introduction video and a step one video.
If you’re the impatient type, you might be tempted to skip the introduction video and go straight to step one. But this would be a mistake, because the introduction video instructs you to fully discharge the battery before you start making the repair (which obviously takes some time).
This step also confused us a little, because if the screen is completely non-functional, how would you know when your battery is (or isn’t) empty?
Since our screen was actually working fine, we found it easy to complete the discharge by leaving the torch on overnight. The next day, we were ready to start the repair process.
The iFixit site warns that replacing the screen is a moderate complexity repair. And with 38 steps that need to be carried out once, then again in reverse, this repair is not for the faint of heart.
Why so many steps? Well, there are 38 steps required to open the phone, remove other parts that are in the way, and gain access to the screen. Then, once the new screen is in place, those 38 steps need to be done again in reverse. This is because the G22 is constructed screen-first, with the other components layered on the back of it, and the only way to gain access is from the rear of the phone working forward.
With so many steps to complete the repair, some processes were notably trickier than others and some were downright stressful. We go into detail about some of the more difficult steps below.
The verdict: How easy is the Nokia G22 to repair?
iFixit estimates that replacing the screen takes one to two hours. It took us 90 minutes from start to finish (after we’d discharged the battery overnight).
With 38 steps to replace the screen, some of which were extremely fiddly and technically difficult, we would not recommend this task for people who haven’t worked with tiny screws and cable connectors previously. It would be very easy to lose a screw or damage one of the connectors.
However, our screen replacement was successful and it did take us under two hours (although we’re probably more familiar with the inner working of phones than most). With the phone fully reassembled, it was very satisfying to connect the charger and see the screen light up.
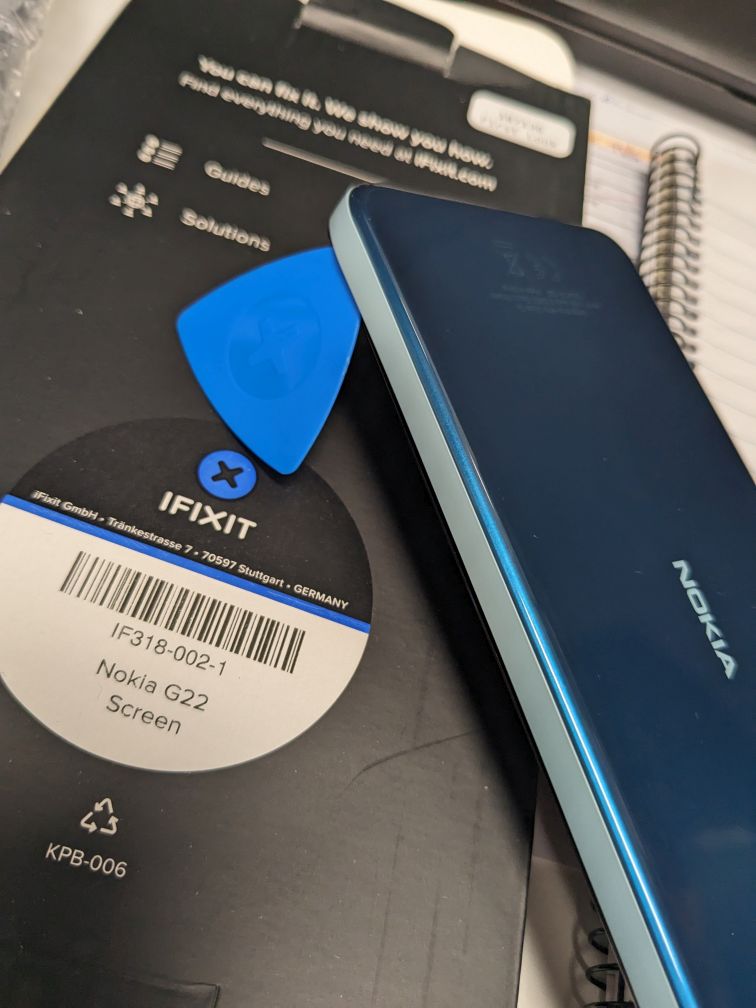
Using the supplied pick to pry open the back cover required a lot of trial and error and repeated removal, reinsertion, and twisting of the pick. We started to worry that we might end up breaking one or more of the plastic tabs that hold the back cover in place.
Inserting the opening pick to remove the back cover.
Removing the vibration motor (step 25)
The vibration motor is held down with adhesive. The instructions suggest using the pointed end of the spudger to pry it up, but despite our best efforts all we managed to do was deform the pointy end of the spudger.
We ended up using the flat edge of the spudger at a few points around the motor which eventually loosened the adhesive enough to get it out.
Removing the power and volume button cable (steps 30 and 31)
This was the step that worried us the most. We were convinced that the cable was going to snap as we kept gently tugging to release the adhesive bonds. It would’ve been useful if the instructions had explained that the replacement screen already has one of these cables attached, so it’s not necessary to re-use the existing one.
Attaching the foam pad (step 34)
When it comes time to perform this step in reverse, during reassembly, you’re instructed to install the foam pad by pressing down gently, and to use adhesive tape if necessary. We found it difficult to cut a tiny piece of tape to size and align the tiny pad in the correct position. Afterwards we found iFixit recommended using a particular type of tape called Tesa that may have made this easier (but comes at an additional cost).
Removing the battery (step 36)
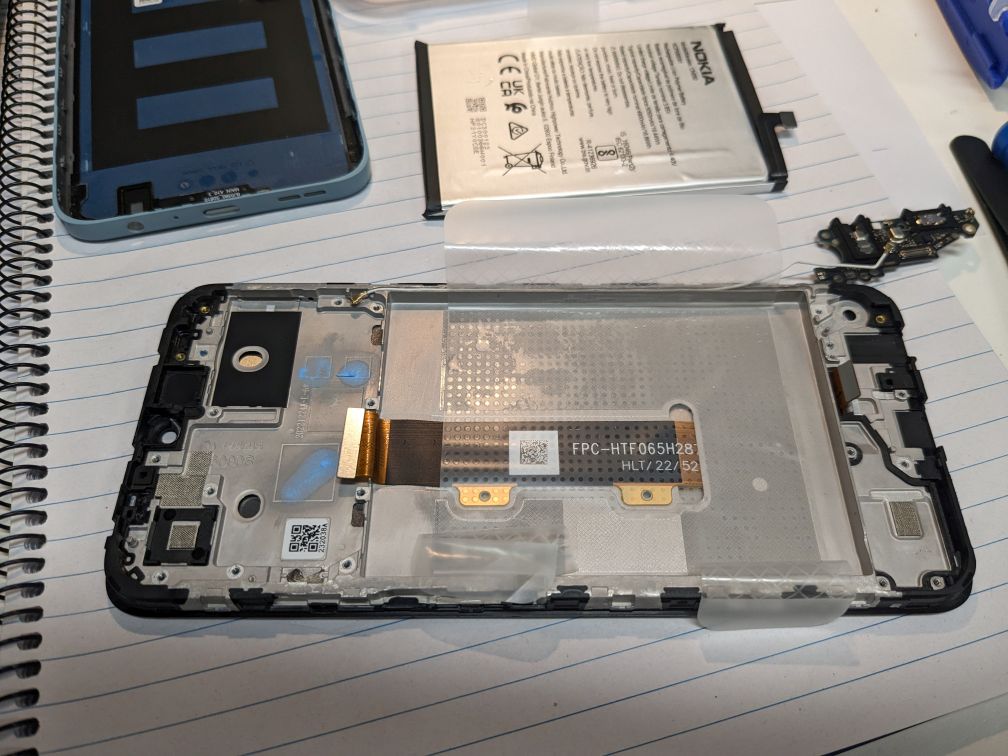
To remove the battery, you need to pull up on a plastic tab to break the adhesive bond underneath the battery. This took a lot of effort and repeated attempts. There was a suggestion to visit “Nokia phones support” and that heat may be required to loosen the adhesive.
There is also a warning that the plastic tab might break. We followed the link to “Nokia phones support”, but there was no mention there of how to use heat to loosen the adhesive. We kept tugging with more and more force until we finally heard soft crackling sounds that indicated that the adhesive was slowly losing the fight.
The Nokia G22 with the battery finally removed.
Is repairing the Nokia G22 yourself worth it?
Unless we were short of money, we’d employ someone else to do the repair for us. Smartphones are full of delicate parts that seem very fragile and easily (and expensively) snapped.
There are other repairable smartphones (not yet available in the Australian market) such as the Fairphone that don’t require you to dissemble so many components of the phone, meaning they can be done a lot faster and easier. This is a safer approach as it removes the possibility of accidentally losing of one of what seems like a million tiny screws.
Smartphones are full of delicate parts that seem very fragile and easily (and expensively) snapped
Having said all that, if you have the motivation to do repairs yourself, it can definitely be done, and there’s no doubt it’s cheaper than having it done professionally. Just make sure you take your time, be patient and read through the all the instructions before beginning.
We look forward to seeing more manufacturers take on this compartmentalised, repairable design, despite the obvious sacrifices we may need to make (such as losing waterproof functionality).
Matthew Steen is the Director of Reviews and Testing, which conducts all the testing for CHOICE. He has had a long and storied history in the consumer movement.
Matthew is driven to work at CHOICE for its constitutional mission and its dedication to making Australia more fair, safe and just.
Matthew represents CHOICE as a council member on the Standards Australia Council. He is also responsible for CHOICE lowering its environmental footprint.
Find Matthew on LinkedIn.
Scott O'Keefe worked at CHOICE from 2004 to 2024. He originally joined as a verifier, and started testing the year after. He went on to become a senior test coordinator in the digital home team and our resident expert on TVs, audio/visual and various other products such as car GPS and phones for seniors.
Before CHOICE, Scott worked in IT for 22 years, mostly as a software engineer and team leader for a large insurance company. He also ran his own business, providing in-home PC and home-theatre support.
His passions include myth-busting, anime, photography, and collecting vintage telephones and scientific hardware – he has an attic museum at home.
He's also passionate about protecting his personal ID and data, so he doesn't have LinkedIn or Twitter accounts.
For more than 60 years, CHOICE has been fighting the good fight for Australian consumers.
In the past year alone we've uncovered systemic issues with sunscreens, investigated shonky supermarket pricing, fought for stronger scam protections and helped make complex energy pricing fairer and clearer.
CHOICE is here to provide unbiased advice and independent testing in our world-class labs. We buy the products we test, just like you do, and our expert reviews are influence free. We’re here to help you choose smarter. Hopefully you’ll also save some money along the way.
Thanks to CHOICE, you’ll never be alone when a business treats you unfairly. You can support our work by joining or donating to our cause.