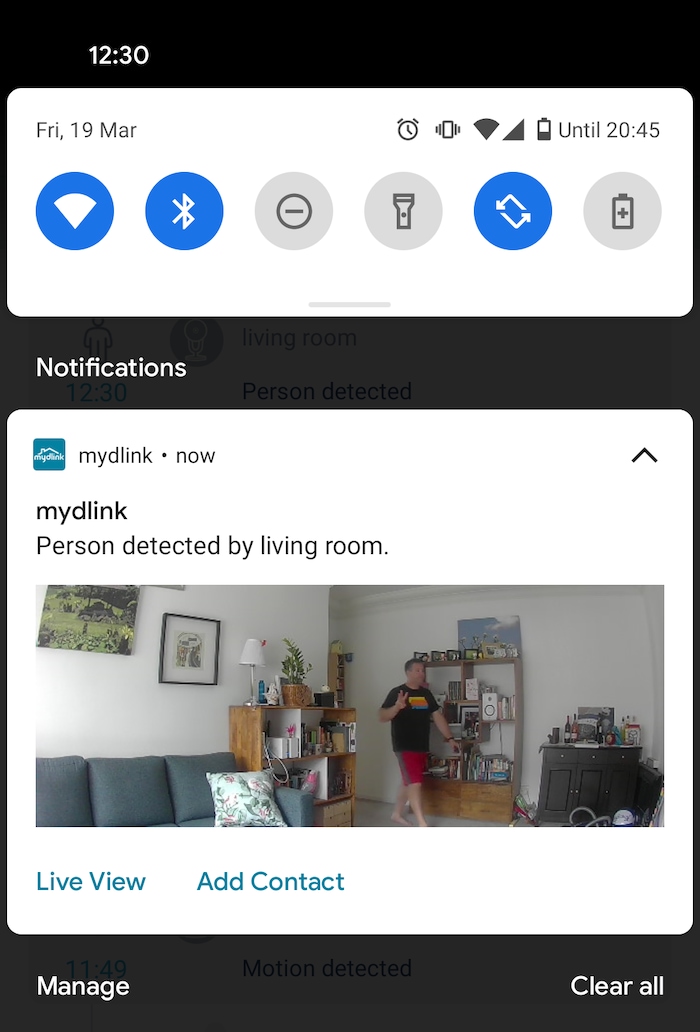
This new indoor full HD Wi-Fi camera lifts the bar for remote security monitoring by including “human” detection to give you alerts that really matter, rather than alarming you every time something moves. Note that it can detect a human, but not identify them – this is not facial recognition. However, with daylight and infrared night vision (5m range) for stills and video, you may still get a recognisable picture of the culprit, though we found image quality a bit soft, especially in night mode. A good point is that this AI feature is available without paying for a subscription.
Workers are increasingly being drawn back into the office as COVID restrictions ease. With homes left unsupervised again during the workday, it might be a good time to think about installing a security camera or two. We tried out the DCS-8300LHV2 courtesy of D-Link to see what difference AI makes.
Person detection
We carried out several tests and found the camera could indeed tell the difference between a person and a moving object. We didn’t have a dog or cat to try it with, but it worked successfully in alerting to a human being moving but not to a bird, whether in a cage or flying around inside the home. If you prefer, you can set it to pick up all motion (not just people) and we found this also worked well.
The motion sensitivity was set to 70% by default and you can adjust it via a slider in the settings. However, you can’t adjust the default duration of recording events. You need to use the mydlink app to install the camera, which we found quite easy, but it requires an online D-Link Cloud account in order to be installed.
The app lets you set up customised “scenes”, so for example you could set a scene that tells the camera not to record when you’re home (privacy mode) and to instead record when you’re away.
You can set up action sequences, or “scenes”, to suit different rooms.
Setting up
The camera has a built-in stand and can sit on a flat surface, or can be mounted on a wall or ceiling (there’s an option to invert the image if you need to mount it upside down). It works better if secured in place as the camera is quite light and if sitting on a flat surface the relatively heavy cable made it difficult to place the camera in the exact position we wanted.
Plugs and screws are provided for wall or surface mounting, but wherever and however it’s mounted, it needs to be near a power outlet as it’s not a battery-powered camera. It runs off a USB adapter with a 145cm USB cable supplied. An extension cord may be required for some installations.
It’s best to set up the camera first before mounting it permanently, so you can try it out to make sure there’s a good Wi-Fi signal (2.4GHz band only). It supports the latest WPA3 wireless security protocol and works with Google Assistant and Alexa.
Recordings
The camera also supports the ONVIF standard, which allows non-battery powered IP cameras to work with different software, mainly for network video recording such as recording to a NAS (network-attached storage) device on your local network.
It can be set to only record when detecting motion, or to record continuously to a NAS device if you want 24/7 coverage, but this might not advisable on a wireless connection as it could be quite demanding of bandwidth.
Support for the ONVIF open industry standard means you can record to network devices too
Note that if you set up ONVIF, then mydlink will inform you that another system has taken over the camera, and that you will no longer be able to use the mydlink software to access it. This will be inconvenient as it will stop notifications and potentially require more work to set up remote viewing of the camera.
To get recordings off the camera, you must download them through the app. You can’t just remove the microSD card and transfer footage over to a computer, because the footage is a series of TS files (one recording event is spread over many TS files), rather than MP4 files that contain a single recording event each.
We found we couldn’t download events from the web interface, which would be more convenient than having to use a phone, as you then have the extra step of getting the footage off the phone. The web interface showed no option to download clips from the camera’s microSD card.
Recordings are in full HD but the quality doesn’t appear very clear unless the lighting is good and the subject isn’t moving. We found motion recordings to be a bit blurred, and the overall image quality was soft and at times a bit “blocky”.
For night recordings, the image was also soft and motion left a trail. If a person moved too close to the camera, a lot of facial detail was lost. The camera’s AI proved to be useful in our tests, and its image quality will be passable if the lighting is good, but nighttime might not give you the results you’d hoped for.
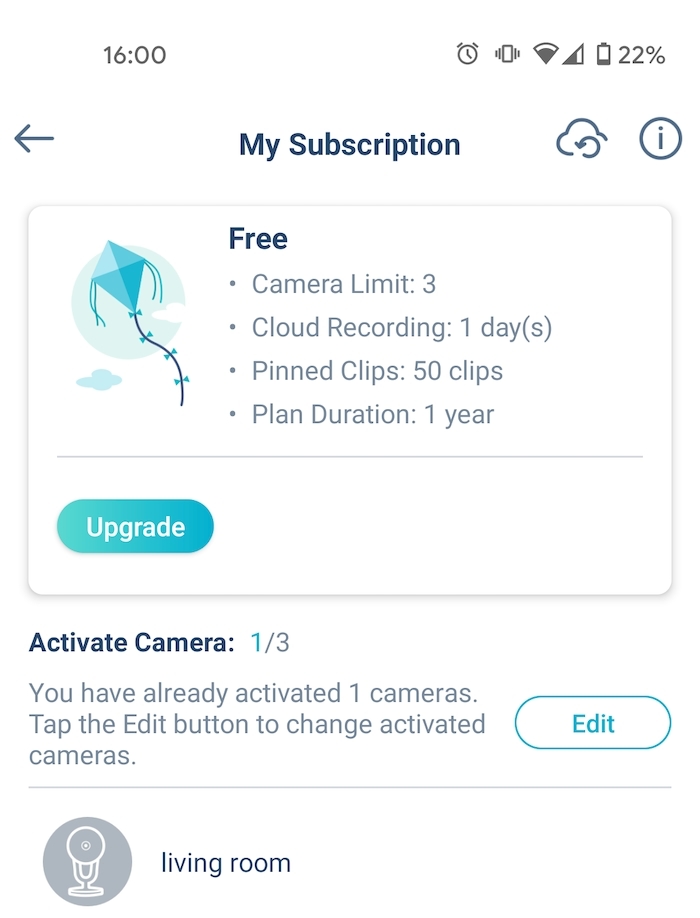
You can use a one-year free subscription if you know where to look.
Ongoing costs
The camera can record to the cloud, but there’s also a microSD card slot. We found there’s no free cloud account when you look at the plans on offer, only a free 14-day trial of the premium plan, which then costs US$4.99 per month. A basic plan costs US$24.99 per year or US$2.49 per month.
However, there’s a free one-year plan that retains up to one day’s worth of recordings, for up to three cameras. This plan shows up when you tap on “cloud” as the storage option within the settings. There’s no option to use both cloud and SD card, so you have to choose one or the other.
For more than 60 years, CHOICE has been fighting the good fight for Australian consumers.
In the past year alone we've uncovered systemic issues with sunscreens, investigated shonky supermarket pricing, fought for stronger scam protections and helped make complex energy pricing fairer and clearer.
CHOICE is here to provide unbiased advice and independent testing in our world-class labs. We buy the products we test, just like you do, and our expert reviews are influence free. We’re here to help you choose smarter. Hopefully you’ll also save some money along the way.
Thanks to CHOICE, you’ll never be alone when a business treats you unfairly. You can support our work by joining or donating to our cause.