You’ve done the research and forked out for a new Windows
desktop or laptop, but you’re not done yet. Once you’ve ripped open the packaging
and powered it up, there are a few things you should take care of.
A little hands-on work will get Windows 11 set up to work more efficiently. Not
only are there various features, shortcuts and settings you might find useful,
there are also safety considerations.
We’ll take a look at some of the more everyday
options, but Windows customisation can go even deeper if you’re willing to put
in the research.
Update Windows version and drivers
Even though it’s a brand new device, the first thing you should do is update because you don’t know how long it was sitting on a shelf.
Outdated Windows versions are less protected than the latest update, leaving you open to various cyber security threats. The same goes for your drivers – software components that let your devices or hardware communicate with your operating system (OS).
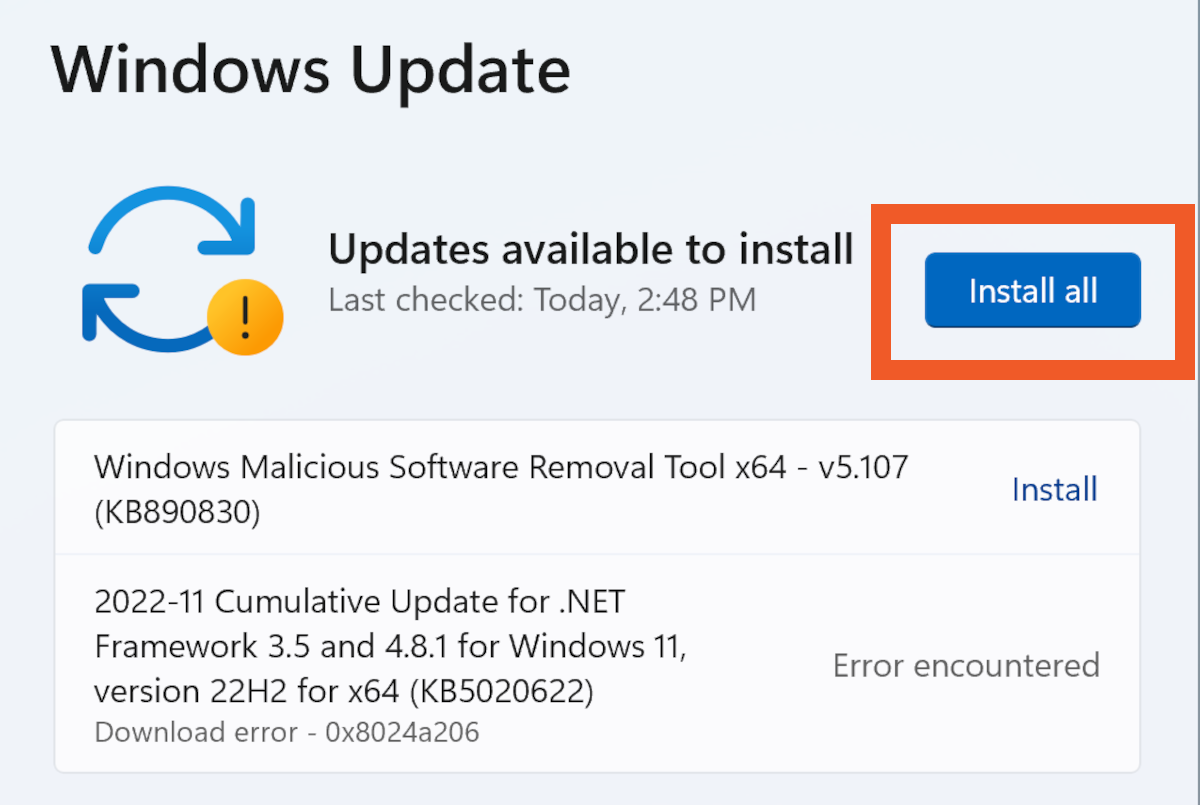
To update Windows, open the Start menu and type Update, then select Windows Update settings. Pending updates will be visible at the top of the page – click Install all. This might take a while and require multiple restarts.
If any options have an “Error encountered” message, this
might be sorted out once you click Install all. If not, do a web search
using the update name and error code to find a solution.
The steps for updating drivers can differ depending on the
type of driver and the device in question, but most of them should come along
with Windows updates.
However, not all drivers make the cut. If your graphics card
(GPU) is integrated into your central processing unit (CPU), you should be fine.
If it’s separate, it’s a good idea to update your graphics drivers manually.
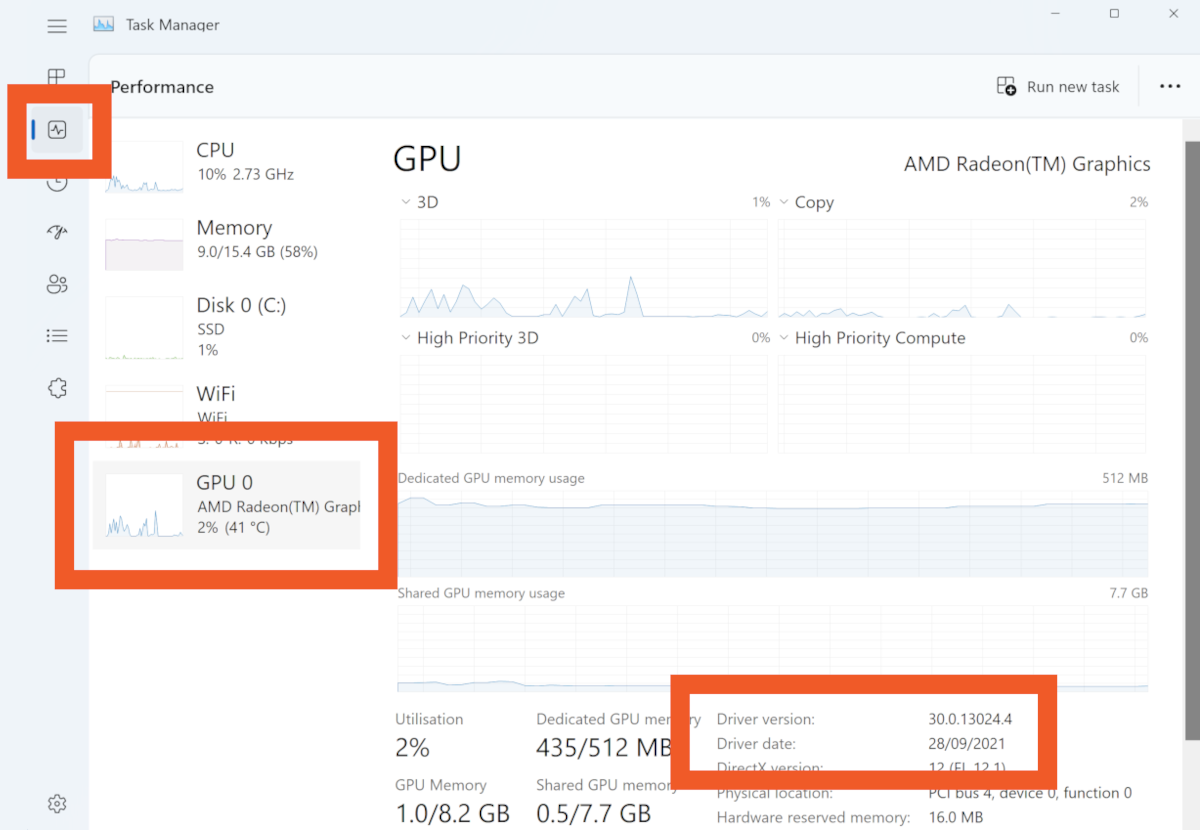
To find your GPU’s name, press Ctrl + Shift + Esc to
open Task Manager. Click on the Performance icon on the left,
then GPU. Your GPU’s name will be in the top right of the window. Also
take note of the Driver date and Driver version information in
the bottom right, which might be helpful in figuring out if your drivers are
out of date.
Broadly speaking for Windows laptops, tablets and pre-made desktops, if your graphics card is from Intel, it’s integrated. If it’s from NVIDIA, it’s separate from the CPU. And if it’s from AMD, it could be either. But there are plenty of exceptions.
To be sure, you can do a web search for your GPU’s name.
Integrated: If your GPU is integrated, the new drivers should have been installed along with the Windows updates you already did. Open the Start menu and type Update, select Windows Update settings and click Check for updates. Download and install any outstanding updates.
NVIDIA: If your graphics card (GPU) is from NVIDIA, head to NIVIDIA’s website, put in your GPU’s product name and download the drivers directly. Once the download finishes, open the file and follow the installation steps.
AMD: To update AMD graphics drivers, head to AMD’s website. From here, you need to find your device within one of the sections listed to the left. The three most likely are Graphics, Processors with graphics and Chipsets.
Next, choose your product’s series list in the middle, then your exact product from the list on the right. If another list pops up on the right at this point, select your product from that one, too. Click SUBMIT. In the next screen, select Windows 11 64-Bit Edition and click DOWNLOAD* next to whichever option has the most-recent release date.
Alternatively, you can scroll to the
Auto-Detect and Install
section at the bottom of this page and click
DOWNLOAD*, then follow the instructions to install.
Turn off Windows data tracking
Depending on the options you chose when installing Windows, you might have allowed Microsoft to collect personal data and activity.
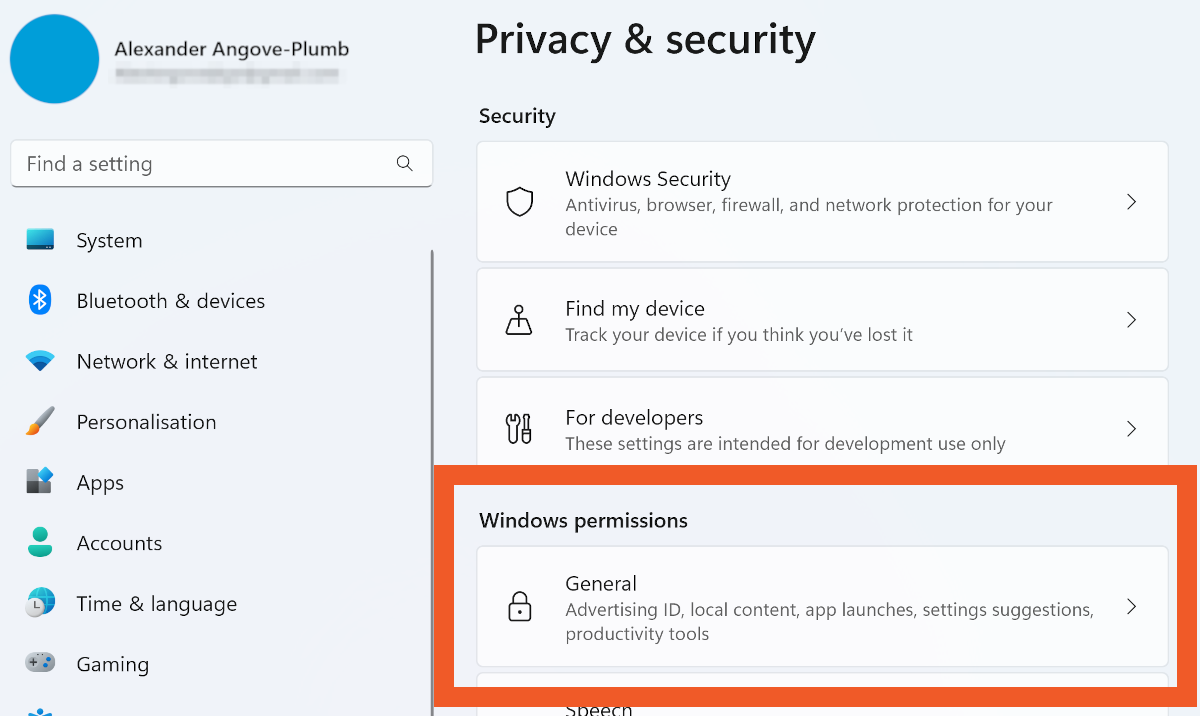
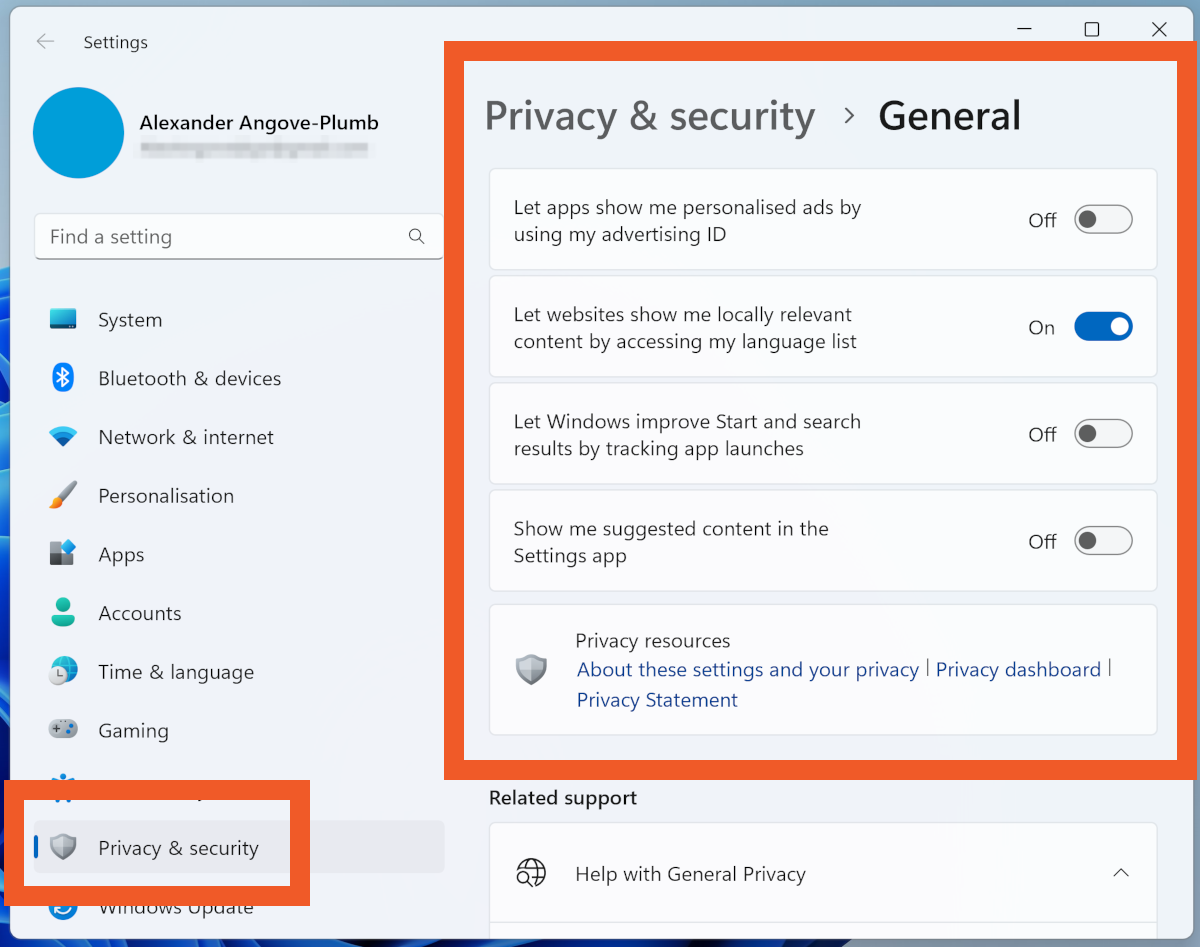
Press the Start key, type Privacy and select Privacy settings. This will open the privacy menu in its General section. Decide which of the four toggles you’d like to leave on, but only the language-based one is particularly useful.
On the left, click Privacy & security to view the other privacy sections.
If you don’t plan on using Microsoft’s Find My Device feature, scroll down the page and click Location, then turn Location services off.
Go back to the main Privacy & security menu and click Account info. From here, control which apps can access your account information. You can disable this feature entirely, but some apps might not work properly.
From the main Privacy & security menu, select Diagnostics & feedback and disable Send optional diagnostic data.
There are a lot of other sections in the Privacy & security menu, so have a browse through and disable or enable at your leisure. Take note of the permissions you disable in case they stop certain apps or features from working.
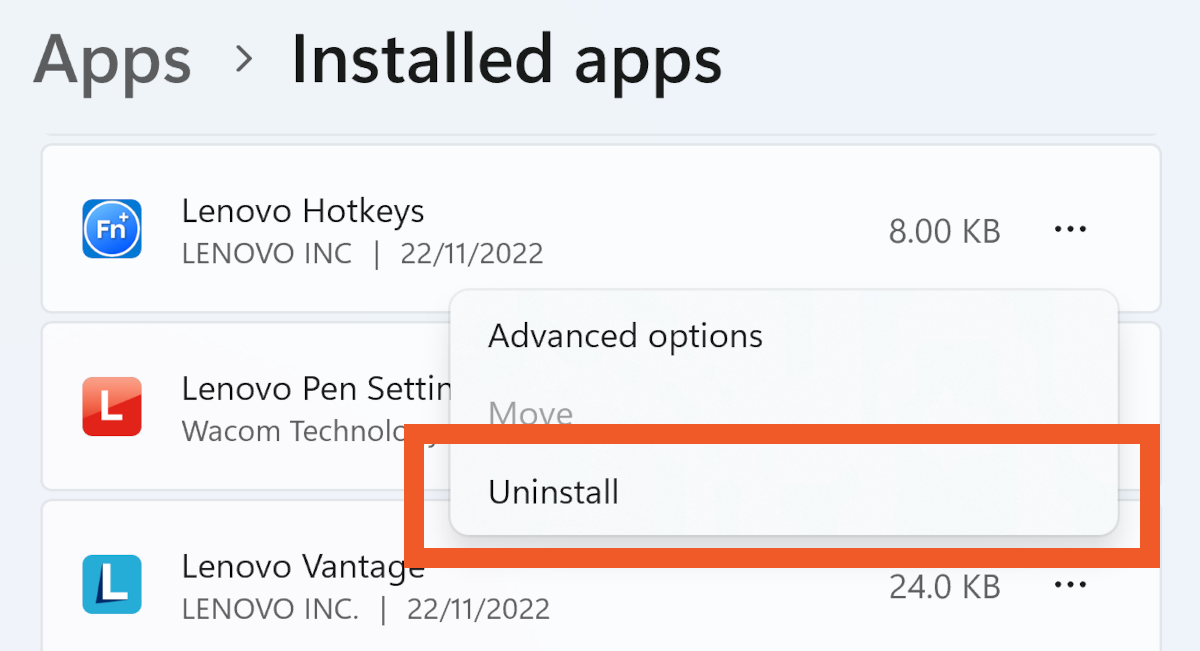
You don’t have to keep these annoying, pre-installed programs.
Remove pre-installed bloatware
Many or most laptops and pre-made PCs have pre-installed software from the manufacturer and its partnered companies. This unnecessary software is often called “bloatware” and it can slow performance and start-up times.
Go to the Start menu and type Remove, then select Add or remove programs to open the Installed apps menu. Click on the three dots (…) next to an unwanted or unrecognised app and Uninstall it.
It’s a good idea to leave anything with “Microsoft Corporation” alone, but you should usually be fine uninstalling apps tagged with your laptop’s manufacturer, of which there could be many.
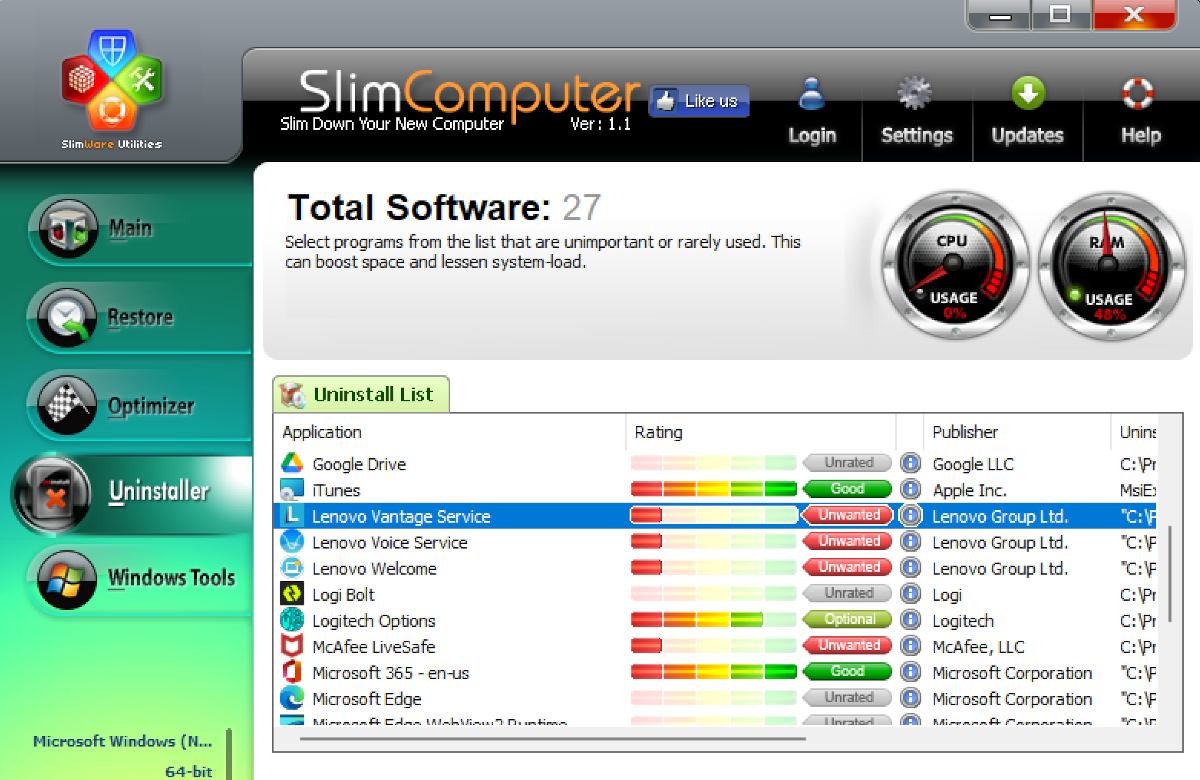
SlimComputer can help indicate what software you might want to uninstall or keep.
If you’re hesitant to start culling away, programs like SlimComputer and Should I Remove It can help you figure out which software to get rid of, but they’re not perfect and the latter of the two now only comes as part of Reason Antivirus.
It’s best to cross-check across both and still use your own judgement.
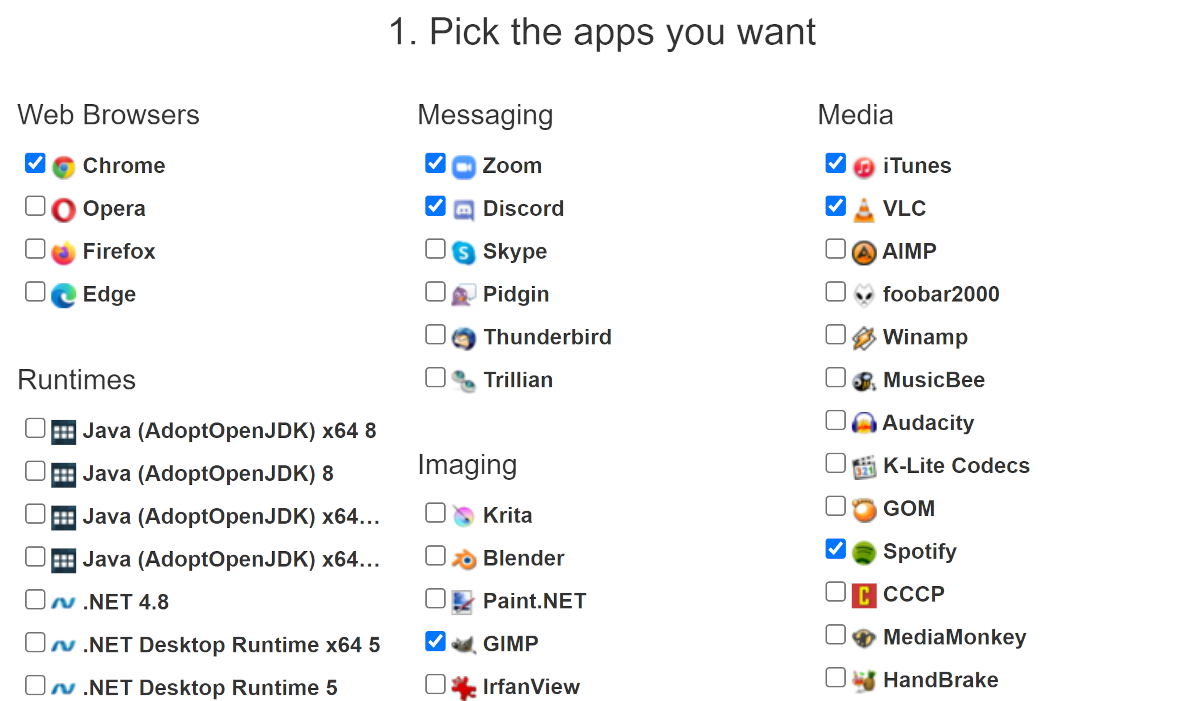
Now you’ve removed bloatware, it’s time to install the software you actually want (leaving this step until now will make deleting all that pre-loaded junk much easier).
Start with your browser of choice and go from there.
Ninite is useful tool for installing multiple programs at once. Check the boxes next to the software you want then click Get Your Ninite.
Once the download finishes, open the file and it will install your selected programs one after another.
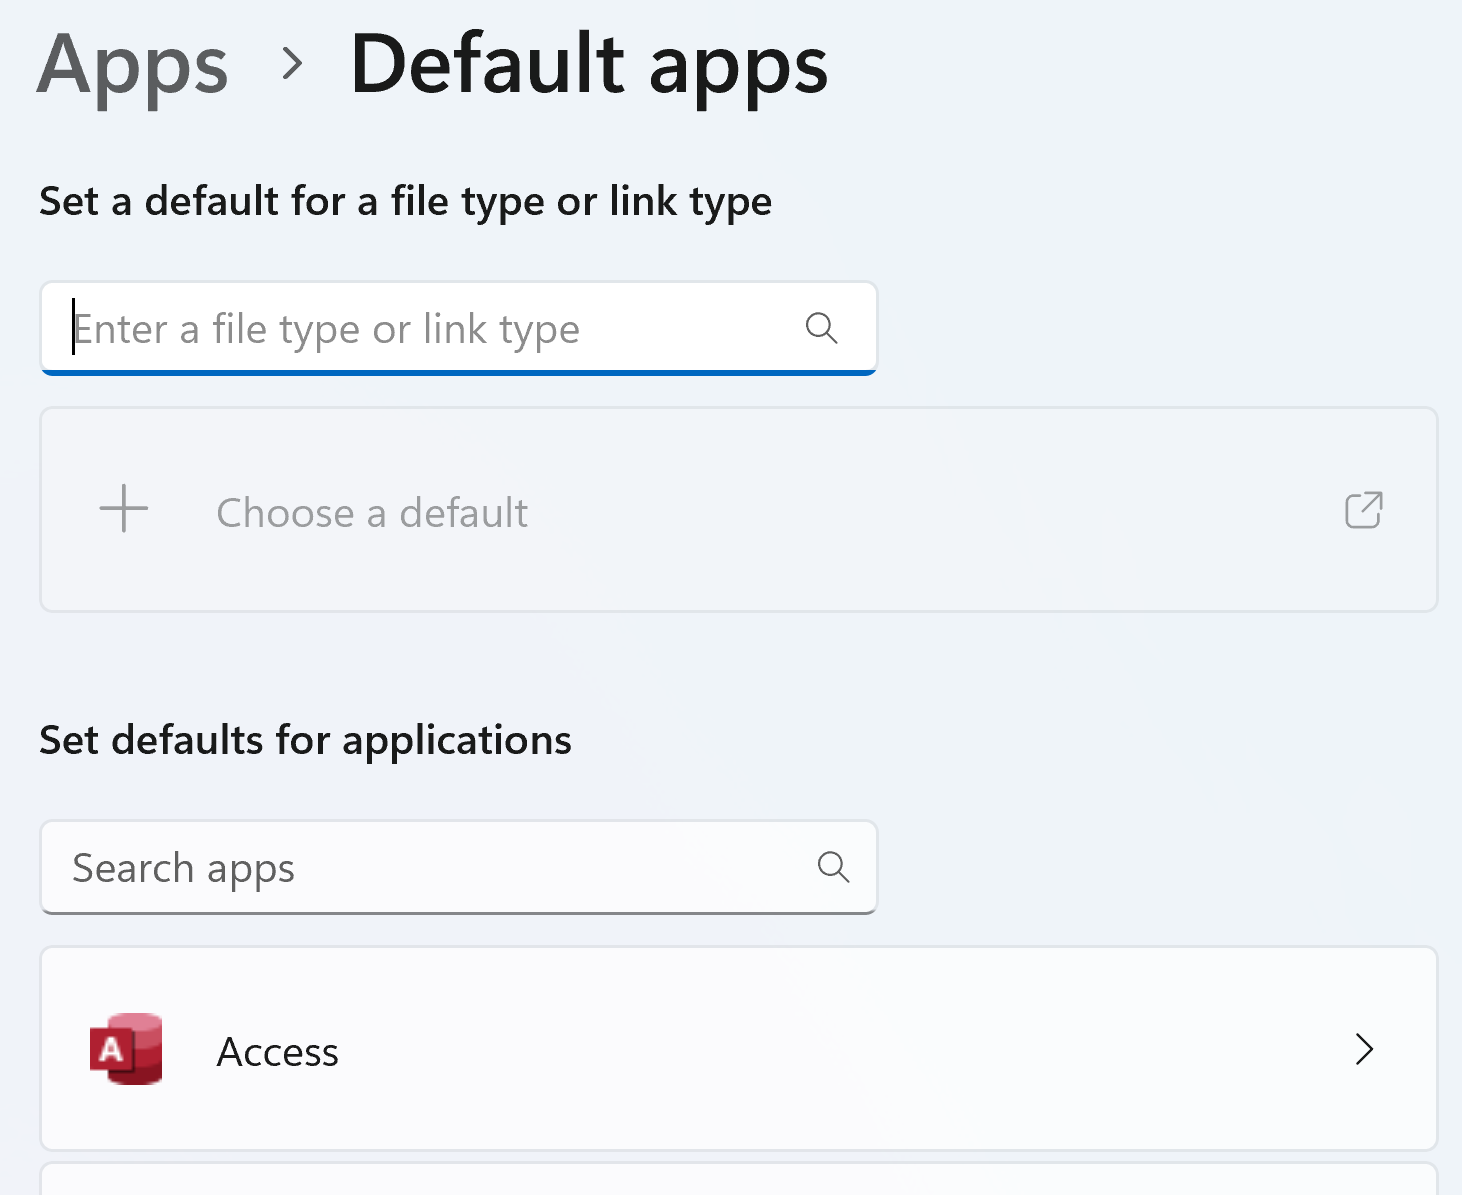
Set your default apps
The Default apps menu in Windows 11 is less useful than its Windows 10 counterpart, thanks to a clunky UI that we found sometimes misses app options.
But it’s probably still the best way to set default apps by specific function (such as web browser) or link type.
Press the Start Key,type Default apps and hit Enter.
To set default apps by function or link type, Windows 11 makes you search for the app, rather than the reverse method of Windows 10 where the function or link type comes first, then is assigned an app.
Scroll through the list or do a search to find the app you want, click on it and adjust the default options. While you’re here, take the time to assign specific filetypes or link types (such as .png) to the app, but don’t bother doing it for apps you’re not already adjusting just yet.
To set specific link types, there’s the Set a default for a file type or link type search bar at the top of the page. But you can also wait until Windows 11 prompts you the first time a new link type is opened.
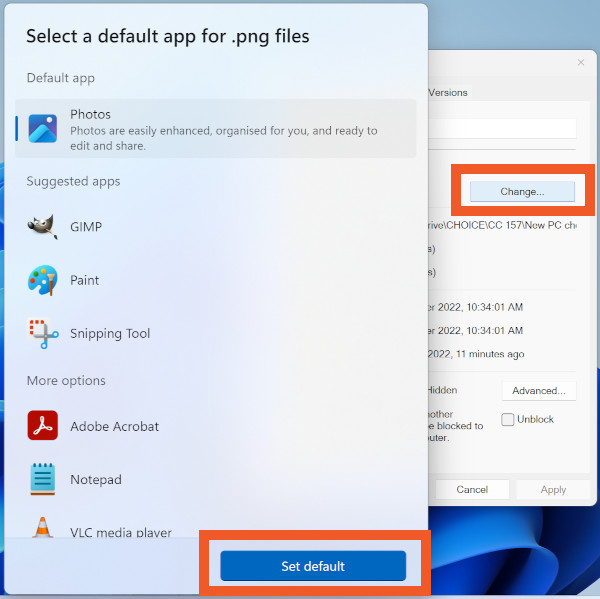
To set specific filetypes, don’t use search bar at the top of this menu. We found it misses a lot of apps. Your best bet is to set a default app the first time you open a certain file type. To do this, right-click on a file (from within File Explorer) and select Properties.
In the General tab, to the right of “Opens with”, click on Change… Select the program you want and click Set default. From now on, that’s the default app for that file type.
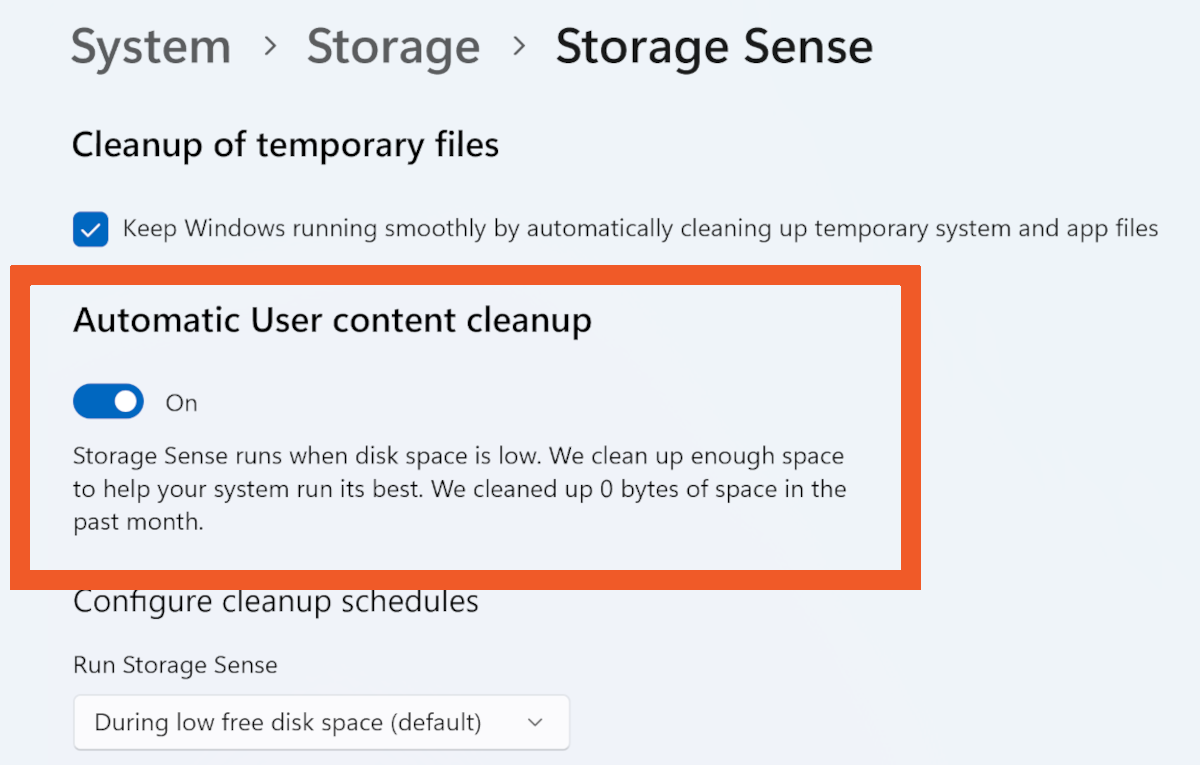
Automatic file management with Storage Sense
Storage Sense periodically empties your recycle bin, temporary files, and downloads folder. For OneDrive users, it can remove files from local storage after a set time without deleting them from the cloud.
To set it up, press the Start key, type Storage Sense, hit Enter and click the right-arrow next to Storage Sense. Click the toggle to turn on Automatic User content cleanup, then adjust the settings to your needs.
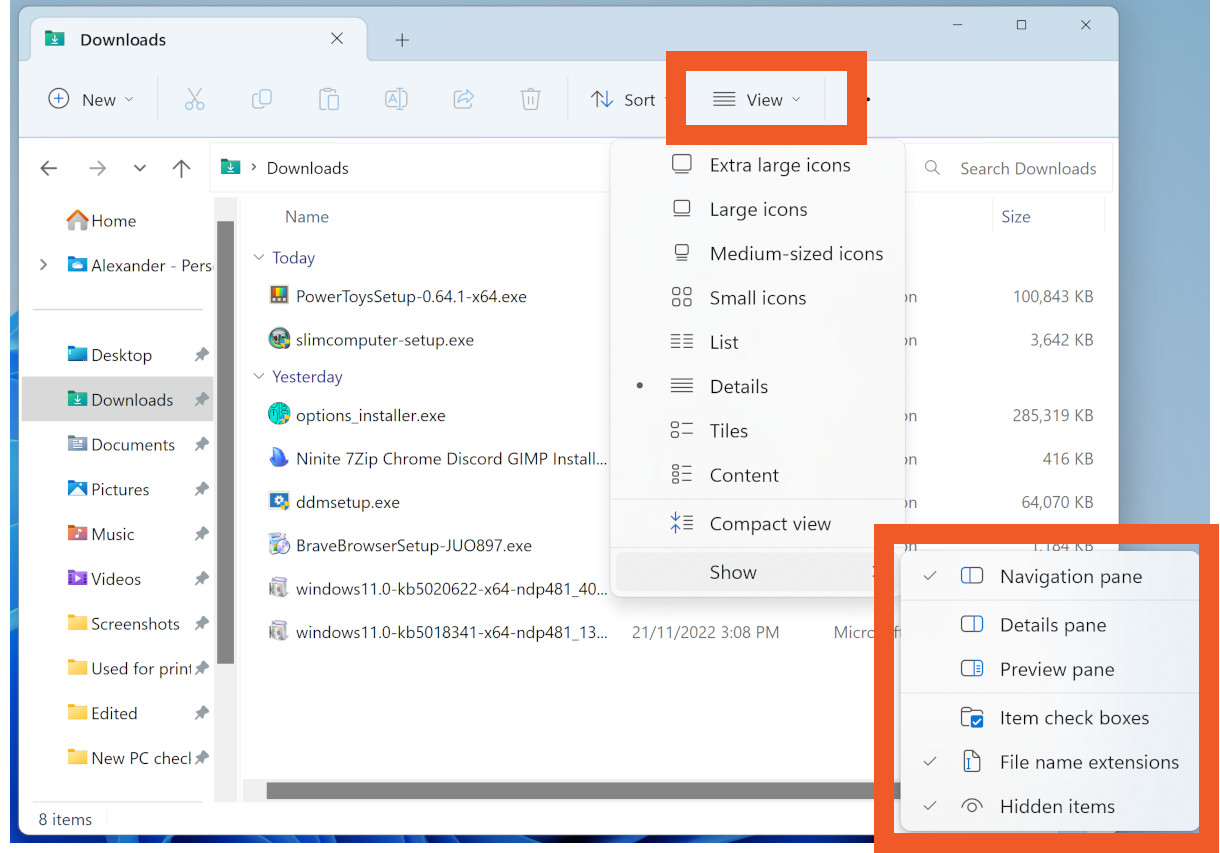
It’s a good idea to turn on File Name Extensions.
This means the filetype (such as .jpg) will always display next to a file. Not
only can this make life easier, it can help prevent you being tricked by
malware.
Filenames in modern Windows versions can include
a full stop, which means a malicious executable file (.exe) could be named
something like “at the beach.jpg”. But turning on filename extensions would let
you see it’s really “at the beach.jpg.exe”.
Open File Explorer and click View > Show > File name extensions.
Follow the same steps again and click Hidden items. This will ensure you can see hidden files and folders, which are good to have visible for the rare occasions when you need them. It also means malware that’s installed itself as a hidden item will be revealed.
Adjust your power mode (laptops and tablets)
Laptops and tablets can balance power consumption versus performance. Press the Start key, type Power options and hit Enter.
Next to Power mode there are three options, though they might differ based on your model.
If you regularly use your laptop unplugged, Balanced should be fine.
Best Power Efficiency increases battery life but this will come at the cost of performance.
If you leave your laptop plugged in to power while you work, Best Performance will improve performance at the cost of higher power consumption.
Windows themes and colours
Customising the look of Windows is a nice way to personalise your device. You can change the colour highlights of the OS, set up dark mode, change taskbar settings and more. Right-click in a blank space on your desktop and select Personalise.
Take a look in each section to see what it can offer you. If you’re a late-night laptopper, we suggest giving Dark mode a go (Colours >Choose your mode), which is easier on your eyes before bed.
For more than 60 years, CHOICE has been fighting the good fight for Australian consumers.
In the past year alone we've uncovered systemic issues with sunscreens, investigated shonky supermarket pricing, fought for stronger scam protections and helped make complex energy pricing fairer and clearer.
CHOICE is here to provide unbiased advice and independent testing in our world-class labs. We buy the products we test, just like you do, and our expert reviews are influence free. We’re here to help you choose smarter. Hopefully you’ll also save some money along the way.
Thanks to CHOICE, you’ll never be alone when a business treats you unfairly. You can support our work by joining or donating to our cause.