USB turntables tend to produce fairly average digital audio files, but you can get good results with higher-end equipment. Unfortunately, most good-quality turntables don’t tend to include a USB output, but it’s still possible to connect them to a PC via a typical home amplifier. This gives you the opportunity to digitise your record collection without shelling out for a new turntable.
Clear a big working space that you can occupy for extended periods. Conversion takes place in real-time, which means 25 minutes worth of music will take 25 minutes to record. Next, make sure the turntable’s tone arm is weighted and that anti-skate and tracking force are set correctly to ensure optimum sound quality. Also, if your records are looking a little worse for wear, give them a good clean-up. See ‘Should you clean your records?’ in our Turntable buying guide.
1x turntable with stereo audio output or inbuilt stereo audio cable (these are usually red and white).
1x PC or Mac with an audio IN port. This is sometimes called line IN (Not sure if your computer has Line IN? See step two under Connect your turntable to your computer).
1x amplifier or receiver, preferably with a phono IN port and stereo audio OUT port (usually labelled REC). If your amp doesn’t have a phono IN port, you may need to buy a phono preamp or turntable with an inbuilt preamp. NOTE: Although we will use the term amplifier for the rest of this tutorial, a receiver can perform the same task in its place. Receivers include a built in radio, which is the only difference.
1x stereo audio cable to connect your turntable to the amp/receiver. If your turntable has an inbuilt cable, you won’t need one of these.
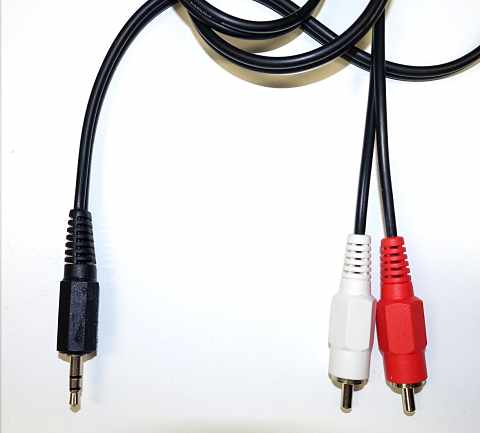
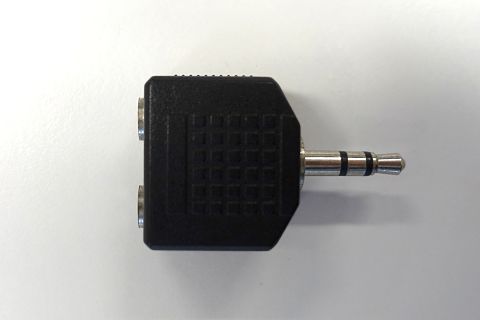
1x stereo audio to 3.5mm stereo cable or 1x stereo audio cable with 3.5mm stereo converter. This will connect your amp/receiver (stereo end) to your PC or Mac (3.5mm end). The 3.5mm end must be able to record in stereo. Check the pin, if it has two black lines it will record in stereo. If it has one, it will record in mono, which is not suitable.
Phono IN
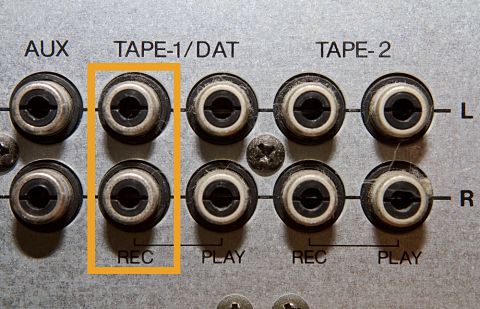
Audio OUT / REC
Do I need to buy a preamp?
If your turntable and amplifier do not have an inbuilt preamp, you will need to purchase an external one. These range in price from around $150 to as much as $25,000! The following setups may or may not require a preamp, and those that do probably don’t really call for a model that pushes into the tens of thousands.
To check whether your home hi-fi has a phono preamp:
Amplifier/receiver: look for a port called Phono on the back of the unit. This is a special port designed for turntables with an inbuilt preamp. These are standard on units that pre-date CD and fairly common on older units built after CD became the standard format. Modern amps vary, except for high-end models which usually include Phono IN.
Turntable: check the manual. Older turntables generally don’t include an inbuilt preamp, as this feature was common in home amplifiers. It’s much more common in new models, however, it can be difficult to determine whether these turntables use industry-standard equalisation or cheap knockoffs, particularly in low-cost models.
If your amplifier has a phono input, or your turntable has an inbuilt preamp, you will not need to buy an external one. If your turntable doesn’t have a preamp, and your amplifier doesn’t have a phono input, you will need to purchase a preamp. Note that if your turntable has an inbuilt preamp, do not connect it to the phono input, as this will unnecessarily apply equalisation twice. In this case, either plug your turntable into another port, or turn off the turntable preamp, either option is fine.
Create a folder to save your audio files to as you edit. WAV files are quite large, around 30mb per track, which means an entire album can be 300MB or bigger. Make sure you have enough space on your hard drive before starting.
Connect your turntable to your amp’s phono input using the stereo audio cable. Next, connect the amp to your computer using the stereo to 3.5mm cable, by plugging the stereo end into the amp’s OUT port, and the 3.5mm end into the computer’s IN port.
This is an example of a PC audio IN port. Note that they aren’t always blue.
This is the audio IN port you’ll find on an iMac and Macbook pro.
My computer doesn’t have line IN.
Some desktops and laptops don’t include a line IN port, but there are a few workarounds:
Purchase a line IN to USB convertor or USB soundcard. They vary in price depending on the build and audio output quality.
Try the microphone port. Many computers combine line IN and microphone IN into a single port. They automatically detect the device that’s been plugged in and adjust internal audio settings accordingly. Unfortunately there’s no way of telling whether this feature is included on your computer without recording test audio and giving it a listen.
If your computer has mic IN and line IN ports, do not use the mic port to record your audio. The equalisation settings are different from audio IN, and aren’t suited to recording music. This can lead to poor quality digitised audio.
Identify the turntable
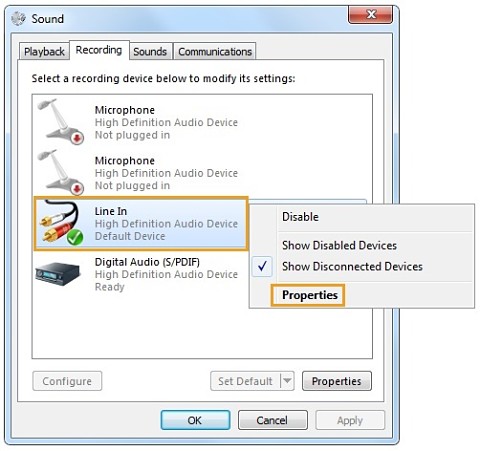
Right-click the Audio icon in the Taskbar next to the clock, click Recording devices. Look for a device with Line In in the description, right-click it and select Set as Default Device to ensure that your PC will only record audio from the turntable.
Right-click it again and click Properties followed by the Advanced tab, then click the dropdown menu underneath Default Format. Here, select 2 channel, 16 bit, 44100 Hz (CD Quality), click Apply then close the windows and return to your desktop.
Open Audacity and go to Transport > Rescan Audio Devices. This will tell Audacity to detect your turntable.
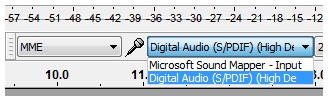
Look for four dropdown menus towards the right side of the Toolbar, and click the second dropdown menu, that’s adjacent to MME. The second toolbar will display a list of input devices. Select the option that includes Digital Audio (S/PDIF) in the title. The surrounding text will vary depending on your computer and turntable model. If this isn’t available, select the first available option then follow the steps in Test the settings. If the waveform doesn’t appear, stop recording and pick another option from the dropdown menu.
If your computer still can’t detect the turntable, check the connection using the steps in Identify the turntable and Rescan Audio Devices again.
Identify the waveform
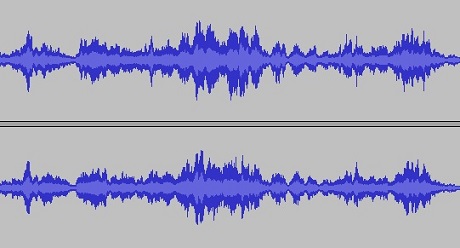
Digital audio is visualised as a long blob with a series of vertical spikes protruding from the top and bottom. This is called a waveform (pictured). The thicker the blob, the louder the volume and vice versa.
Spikes indicate high peaks, such as cymbal crashes, and low bottoms. Flat, thin lines indicate silence. These are usually a good identification point for the beginning and end of each song.
Test the settings
Now it’s time to check for interference. First, press record (the red circle towards the top left corner of the screen), turn on your record player but do not start playing the record. Let Audacity record silence for around 20 seconds.
Click the waveform, press play and listen for interference such as buzzing. This can be caused by poorly shielded electronics in the vicinity of your record player. If you do hear interference, locate the source by turning off surrounding electronics and running test recordings until it disappears.
If there’s no interference, delete the audio file and repeat step one, but play the record this time. After 20 seconds, stop recording, then listen to the audio on your computer. If you’re happy with the sound quality, delete the test file and get ready to digitise the entire album.
Press record in Audacity then play the album as normal to begin digitisation. The conversion takes place in real-time, which means 25 minutes of music will take 25 minutes to record.
When side A is finished, flip the record over and repeat the above step to record side B, but don’t stop Audacity from recording.
When side B is finished, stop recording in Audacity and remove your record. You should see one big waveform in Audacity. Click it, press play and listen to a short sample to check for prominent errors.
Adjust the volume
You may find that the volume is quite low on the initial recording. If that’s the case, follow these steps to boost it.
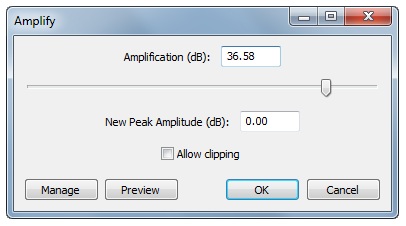
Go to Effect > Amplify to open the Amplify window.
Audacity should automatically generate an ideal amplification level, but you can increase/decrease this by moving the slide bar. However, Audacity won’t let you increase the volume beyond the point of damaging the audio, unless you tick Allow clipping. We don’t recommend this.
Click Preview to check the volume. When you’re happy with the settings, click OK to apply.
Clean up the sound quality
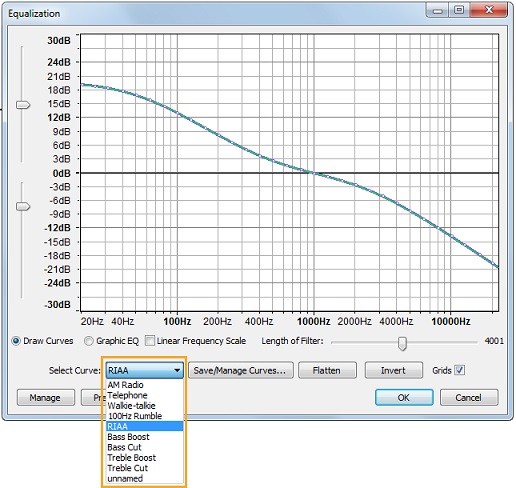
Now it’s time to clean up the digital audio. The first step is to potentially apply RIAA (Recording Industry Association of America) equalisation. This is an industry sound quality standard for phonograph records (including vinyl) which has been in place since 1954. Some record players include inbuilt RIAA equalisation in the preamp, which means digitised files sourced from these players do not require an additional RIAA application in Audacity. Check the instruction manual of your record player for any RIAA information. If it’s absent, you may need to apply RIAA equalisation.
First, press Ctrl + A to highlight the waveform, then go to Effect > Equalization, click the dropdown menu next to Select Curve, click RIAA, then OK to apply the equalisation.
Listen to a few tracks for around 10 to 20 seconds each. If you’re happy with the sound quality, leave the RIAA in place. If you preferred the sound before applying RIAA equalisation, press Ctrl + Z to undo the setting. It’s up to you, and your ears, as to whether you want to use RIAA or not.
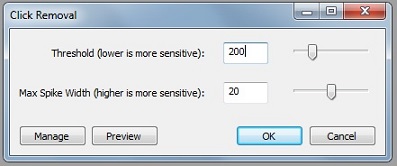
Next step is to remove clicks and pops. Go to Effect > Click Removal to set the click/pop limitations. Threshold detects clicks. A lower number will increase the detection sensitivity, but pushing it too far can cause Audacity to start removing elements from the music, damaging the sound quality. Spike width is similar, except a higher number equals greater sensitivity. Play with these settings and press Preview to hear a sample. Once you’re happy with the level of sensitivity, click OK to apply the settings.
Unless you want to export an entire album as one long digital audio track (you won’t), you’ll need to export each song individually. First, find the start point of a song in the waveform, left-click it, then highlight the waveform until you reach the end point of the song by holding the left mouse button and dragging it to the right.
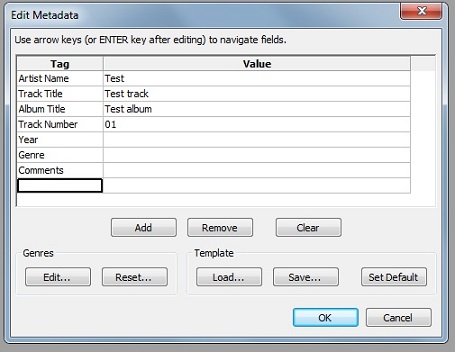
Once it’s highlighted, go to File > Export Selected Audio, locate the folder you want to save it to, enter a file name then click the Save as type dropdown menu (bottom of the window) and pick WAV (Microsoft) signed 16-bit PCM. Then click Save to open the metadata window.
Here, enter the artist name, track title, album title and track number then click OK to export the track.
Check for errors by playing the WAV file from start to finish.
Repeat these steps for each track.
What about MP3?
It’s best to export files in lossless WAV quality, but Audacity can export to MP3 as well, which is a compressed format suitable for portable music players such as iPods and smartphones. Audacity doesn’t include an MP3 encoder due to licensing restrictions, but you can download one called LAME through Audacity for personal use.
Follow the Cut up and export steps (above), but select MP3 Files from the Save as type dropdown instead of WAV, then click Save. After you enter the metadata, a Locate LAME window will open. Click Download to open an online guide by Audacity, which shows you how to download and import the LAME MP3 encoder. Note that LAME isn’t available for free in all territories. Restrictions are outlined in Audacity’s legal disclosure.
Peter Zaluzny is a Content producer in the Digital home team. He covers everything from home entertainment and personal safety devices to tech for your car and mattresses.
Peter enjoys cutting through the nonsense to help people understand the products they’re considering to buy. He helps consumers make educated, informed decisions.
Peter has a Bachelor's degree in Journalism and a Bachelor of Arts from the University of Wollongong.
For more than 60 years, CHOICE has been fighting the good fight for Australian consumers.
In the past year alone we've uncovered systemic issues with sunscreens, investigated shonky supermarket pricing, fought for stronger scam protections and helped make complex energy pricing fairer and clearer.
CHOICE is here to provide unbiased advice and independent testing in our world-class labs. We buy the products we test, just like you do, and our expert reviews are influence free. We’re here to help you choose smarter. Hopefully you’ll also save some money along the way.
Thanks to CHOICE, you’ll never be alone when a business treats you unfairly. You can support our work by joining or donating to our cause.