You can boost your PC’s performance and storage space by upgrading your main system drive, which is the drive your operating system runs from. You can also make a portable system drive that you can plug into another PC,
essentially creating a portable, plug-and-play Windows experience.
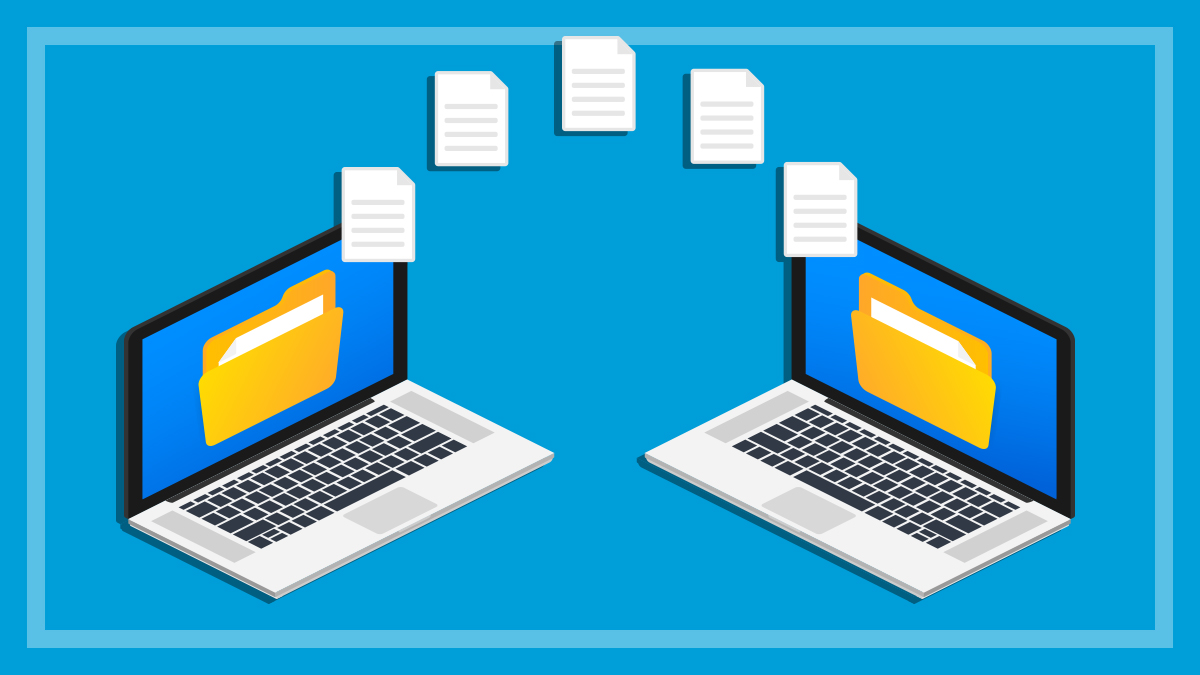
Both of these are easiest done via cloning to create an exact copy
of a current Windows drive on a new one.
Unfortunately, Microsoft no longer supports Windows’ built-in full-disk backup feature, which could once be used to create replica drives.
As a result, while you can still easily create a system image via Windows, applying that image to any drive other than the original is now fraught with setbacks and bugs.
Getting started
When it comes to cloning your drive, free third-party software such as AOMEI Backupper Standard and Macrium Reflect are good replacements for Windows’ old tools.
We’ll use Macrium
Reflect for our run-through.
You will need:
your old drive
your new drive, wiped clean and formatted to
NTFS (likely the condition it came in)
the ability to connect both drives to your PC at
the same time
a 1GB or larger USB stick
an internet connection.
Optional:
an 8GB USB stick
a third drive to use as a backup.
You might need to initialise and create a new volume on your new drive. Right-click on the Start menu icon and select Disk Management.
If your drive needs initialising, it will prompt you to do so.
Make sure the GPT option is selected and click OK.
Once done, right-click the drive and select New Simple
Volume… then follow the prompts.
Make sure it’s formatted as NTFS.
Backing up your old drive
You should always back up your old drive first in case
something goes wrong. Some programs let you back up
to the cloud, avoiding the need for a third storage drive.
You could save your important files to a cloud storage service
such as OneDrive, Google Drive, Dropbox or others as a precaution, but it’s not
a full backup.
In either case, you should also create a Windows Installation
USB stick (must be 8GB or larger). This will let you re-install or repair Windows
if there’s a problem. Keep this USB stick handy for future emergencies. Instructions and software are available at the Microsoft website.
Finally, make sure your new drive is plugged into and detected
by your PC.
Familiarise yourself with your PC’s boot preferences. You’ll
need this menu at least twice during the cloning process, but probably more if things don’t go smoothly. It’s best to learn how to access and use it before you get into the nitty gritty to avoid frustration.
It’s also how you use
your Windows Installation USB in case of emergency.
To change boot preferences, you need to access your BIOS
menu, also called the UEFI. There are two ways of doing this, depending on your
PC:
during startup
from within Windows.
BIOS/UEFI menus change depending on the PC, but the boot section
should be clearly labelled and boot preferences are normally adjusted by
selecting drives from drop-down menus or by clicking arrows to move them up or
down in a list. Memorise the name of your current primary boot drive, but don’t
change anything yet.
When you eventually get to the stage of changing boot
preferences, you’ll likely need to save when you exit the BIOS/UEFI, but for
now discard any changes and continue loading the PC.
Changing boot preferences during startup
While your PC is booting (before Windows loads), you might
see a prompt such as ‘Press Delete or F2 to launch BIOS’. It might instead use
the term ‘UEFI’ or require you to press another key. Doing so will cease the
startup process and take you to a menu where you can adjust boot preferences.
Changing boot preferences via Windows
Some PCs, generally laptops or Windows tablets, don’t allow
you to access the BIOS/UEFI during startup.
If this is the case for you (in Windows 10), open the Start
menu then click Settings > Update & Security > Recovery
> Restart Now. In Windows 11, the process is Settings > System
> Recovery > Restart Now.This will restart your computer
in recovery mode.
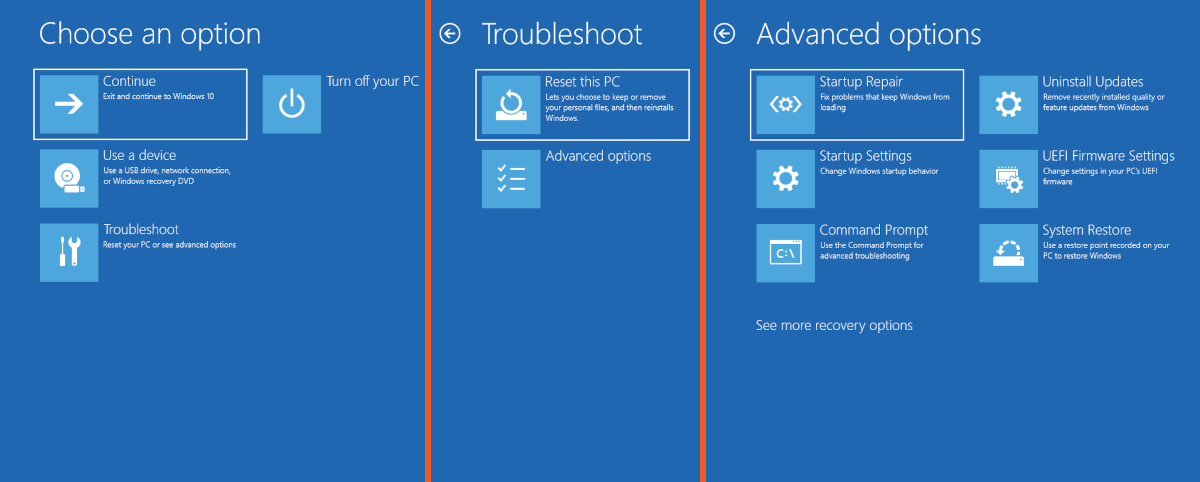
Once the recovery environment loads, select Troubleshoot > Advanced options > UEFI firmware settings > Restart. Your PC will restart again and give you access to your BIOS.
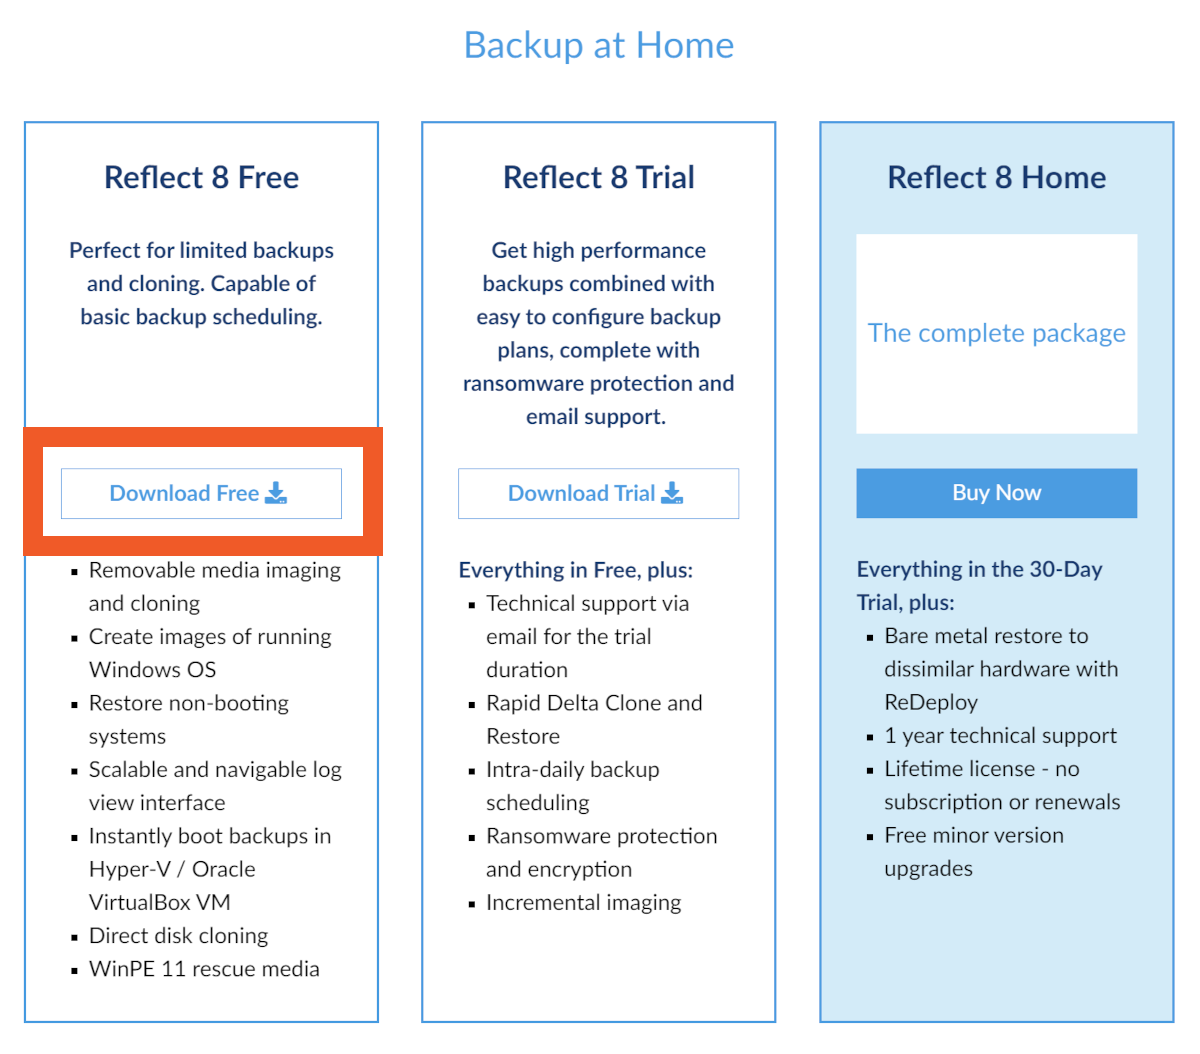
Click Download
Free under ‘Reflect 8 Free’ and select I need a personal license.
For the download, you need to provide your email address,
after which you’ll receive an email with instructions to follow.
The email will
also contain a registration code, and using this is optional.
Cloning your Windows system drive
Once Macrium Reflect launches, you’ll see a list
of all connected drives and media discs. Your current system drive (C drive)
should be at the top, listed by Macrium as Disk 1. Your new drive could be
listed as anything from Disk 2 on. Ours was Disk 3.
Use Macrium to make a rescue USB
There’s one more step before you start cloning, which is to create
a rescue media USB on your 1GB stick. This isn’t optional.
Go to Other Tasks > Create Rescue Media >
Build then tick the box and click OK.
If your USB drive needs formatting, it will prompt you. In
this event, click Format disk and make sure NTFS and Quick
format are both selected. When the format is done, return to Macrium Reflect
and start this process again.
Once the rescue media is created, click Close.
Start cloning
It’s
finally time to clone your drive. Left-click on the drive you want to
clone and select Clone this disk… underneath it. Then select the new
disk you want to clone to.
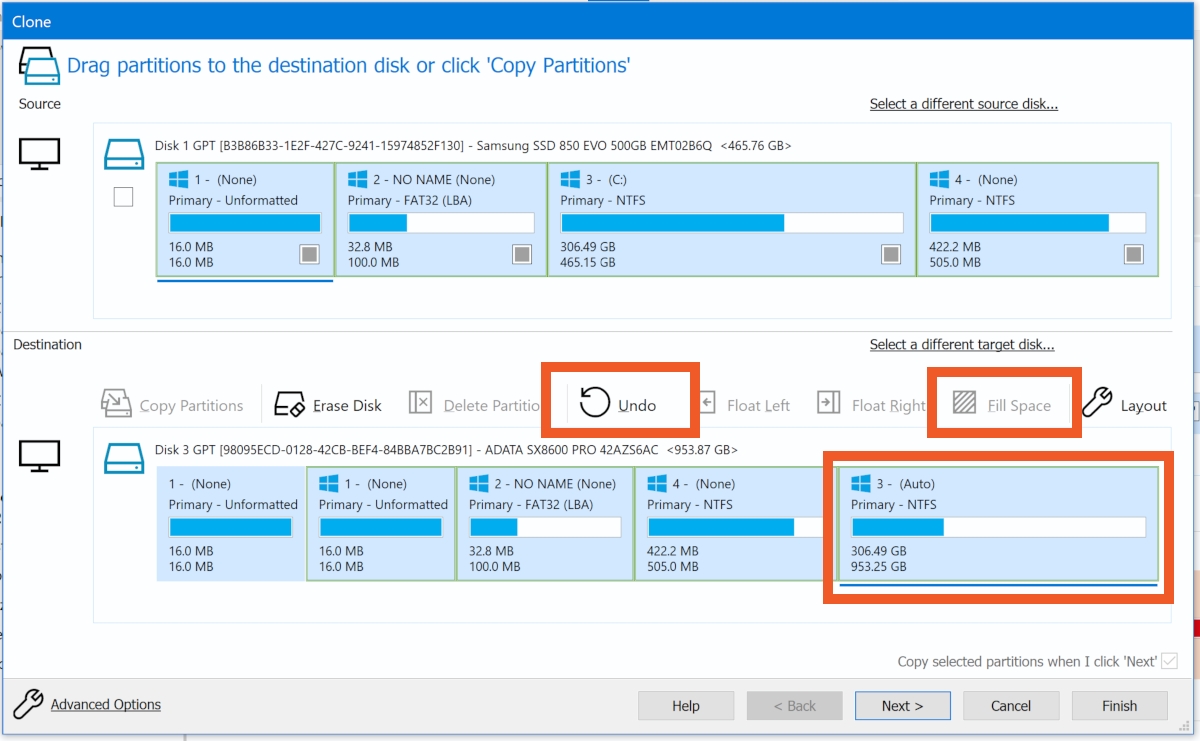
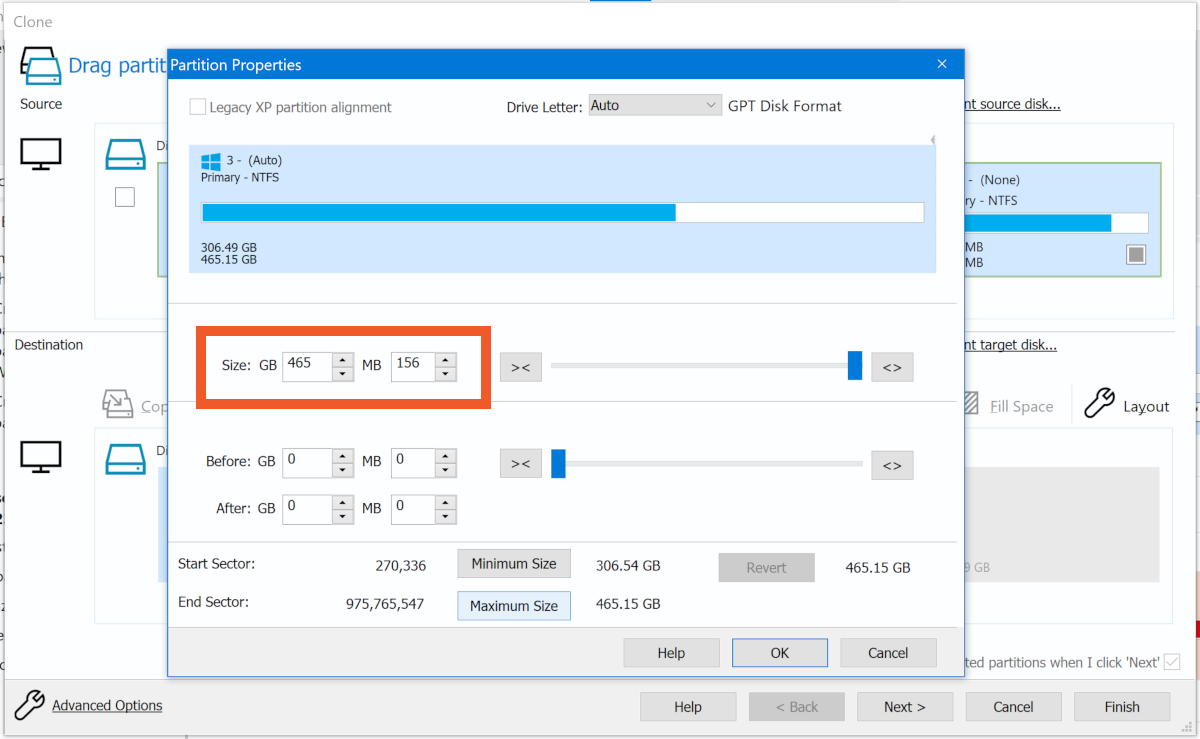
At this point the process changes depending on if your new
drive’s capacity is larger, smaller or the same size as the original.
If it’s the same size… Drag and drop each partition from the
original drive to the new one, keeping the same order.
If it’s larger or smaller… When dragging and dropping
partitions, add the main (largest) partition last to find out what size it
needs to be. If the new drive is smaller, it will automatically shrink. If it’s
larger, right-click on it and select Fill Space. Memorise or
write down the size of the now-expanded (or shrunk) partition.
Click Undo until you can add the primary partition in
its original order then right-click on it and select Partition Size
and Layout… Input the size you recorded and click OK. Now the
remaining partitions should perfectly fill your drive.
Once your partitions are set, click Next then Finish.
Uncheck ‘Save as a Backup Definition File’ but leave ‘Run this backup
now’ checked. Hit OK then Close to begin cloning.
Our clone of under 350GB from a SATA drive to an NVMe drive took
about 30 minutes.
Finalising your newly cloned drive
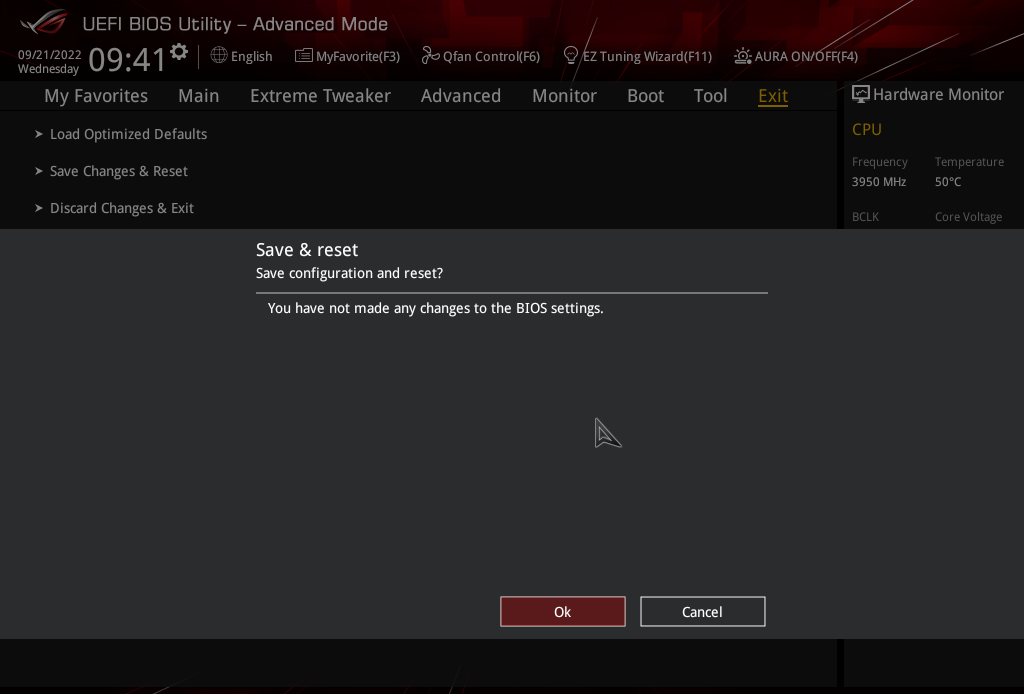
Now it’s time to test your new drive. Go to your PC’s boot
menu and give boot priority to the
new drive, then save changes and exit (the exact wording of this last option will vary).
If it says you’ve made no changes, just ignore it.
Your PC should restart and appear identical to your old
drive, though it might be a little slower the first time around.
If everything worked, return to your boot menu and prioritise
the 1GB rescue media USB you created via Macrium Reflect (not your 8GB Windows Installation
USB). This launches a very basic version of Macrium Reflect.
Click Fix Windows boot problems and you should see a
dialogue box with your new system drive listed. Click Next > Finish.
This will help make sure there are no problems. Now you can restart your computer
via the power icon in the bottom corner of the screen and, for the last time,
open your boot menu. Make your new drive the primary boot option again and save
changes before exiting.
It’s a good idea to restart your PC multiple times to make
sure the new drive will boot reliably, but otherwise you’re done.
What to do if your cloned drive won’t load Windows
If your new drive refuses to load Windows, you might be able
to repair it via the Windows Installation USB.
Restart the PC and set the Installation USB as your boot
priority. Make your way through the screens, but don’t select Install
Now when prompted. Instead, select Repair your computer.
Go to Troubleshoot > Startup Repair. If it
says it failed to fix the problem, that doesn’t mean it did. Restart the PC
again and return to the boot preferences menu. Look for a new drive option
beginning with ‘Windows Boot Manager’, followed by the name of your desired
drive. Make it the priority and save changes when you exit.
For more than 60 years, CHOICE has been fighting the good fight for Australian consumers.
In the past year alone we've uncovered systemic issues with sunscreens, investigated shonky supermarket pricing, fought for stronger scam protections and helped make complex energy pricing fairer and clearer.
CHOICE is here to provide unbiased advice and independent testing in our world-class labs. We buy the products we test, just like you do, and our expert reviews are influence free. We’re here to help you choose smarter. Hopefully you’ll also save some money along the way.
Thanks to CHOICE, you’ll never be alone when a business treats you unfairly. You can support our work by joining or donating to our cause.